In the mobile development ecosystem, user retention is the “Holy Grail.” An application might be technically perfect, but if the user never opens it, it serves no purpose. This is where communication strategy comes into play.
Many novice developers (and some experienced ones) confuse terms or use the wrong tool for the job. When should I use a local notification? What infrastructure do I need for Push? How do I design an In-App notification that isn’t intrusive?
In this in-depth tutorial, we will break down the architectural differences, use cases, and technical implementation using Swift and SwiftUI for all three types of notifications: Local, Push, and In-App.
1. Local Notifications
Concept and Architecture
Local notifications are scheduled, configured, and triggered entirely from the device itself. They do not require an external server or an internet connection to function once they have been scheduled.
They are ideal for time-based reminders (alarms, timers) or location-based triggers (geofencing). From the operating system’s perspective, they are managed via the UserNotifications framework.
Key Features
- Origin: The user’s device.
- Dependency: No backend or internet required.
- Cost: Free and immediate.
- Privacy: Requires explicit user permission.
Implementation in SwiftUI
To implement local notifications, we need to interact with the UNUserNotificationCenter.
Step 1: Request Permissions
First and foremost, we must ask for permission. It is best practice to do this at a contextual moment, but for this example, we will do it when a view initiates.
import UserNotifications
import SwiftUI

class NotificationManager: ObservableObject {
    static let shared = NotificationManager()

    func requestPermission() {
        UNUserNotificationCenter.current().requestAuthorization(options: [.alert, .badge, .sound]) { success, error in
            if success {
                print("Permission granted")
            } else if let error = error {
                print("Error: \(error.localizedDescription)")
            }
        }
    }
}
Step 2: Schedule the Notification
A local notification has three parts: the Content (title, body, sound), the Trigger, and the Request.
func scheduleNotification(title: String, body: String, timeInterval: TimeInterval) {
        // 1. Content
        let content = UNMutableNotificationContent()
        content.title = title
        content.body = body
        content.sound = UNNotificationSound.default

        // 2. Trigger (E.g., 5 seconds from now)
        let trigger = UNTimeIntervalNotificationTrigger(timeInterval: timeInterval, repeats: false)

        // 3. Request (Unique identifier is crucial for canceling or updating)
        let request = UNNotificationRequest(identifier: UUID().uuidString, content: content, trigger: trigger)

        // 4. Add to notification center
        UNUserNotificationCenter.current().add(request)
    }
Step 3: UI Integration
struct LocalNotificationView: View {
    var body: some View {
        VStack(spacing: 20) {
            Text("Task Manager")
                .font(.title)

            Button("Request Permissions") {
                NotificationManager.shared.requestPermission()
            }

            Button("Remind me in 5 seconds") {
                NotificationManager.shared.scheduleNotification(
                    title: "Time to code!",
                    body: "Don't forget to review your pull requests.",
                    timeInterval: 5
                )
            }
        }
    }
}
Important Note on Lifecycle: If the app is in the foreground, by default, the notification is not visually shown (even though the event triggers). To show it even when the app is open, you must implement the UNUserNotificationCenterDelegate.
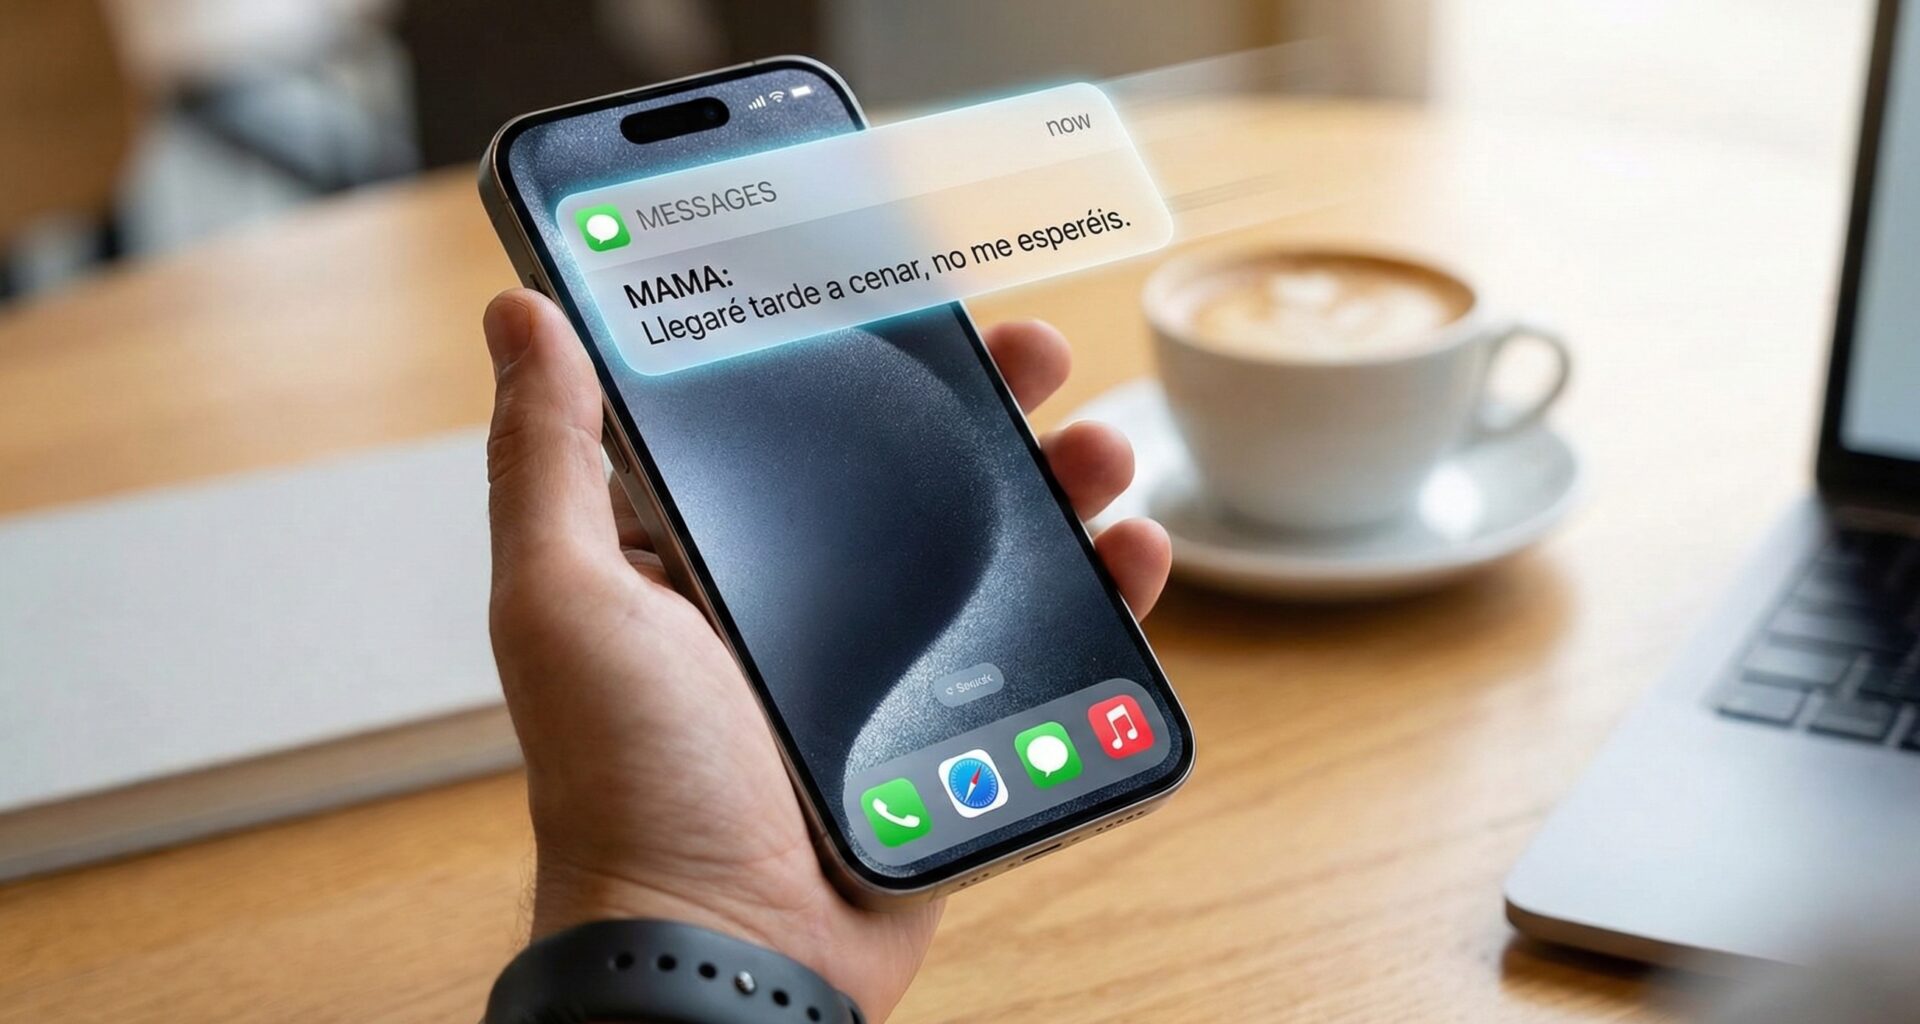
2. Push Notifications (Remote Notifications)
Concept and Architecture
Push notifications are messages sent from a remote server to the user’s device. They are the most powerful tool for “re-engagement,” allowing you to reach the user with new information (breaking news, a new like, a chat message).
The Workflow (APNs)
Unlike local notifications, the architecture here is complex:
- Your App requests a token from the device.
- The device requests the token from APNs (Apple Push Notification service).
- Your App sends that token to Your Server (Backend).
- When an event occurs, your Backend sends the message + the token to APNs.
- APNs delivers the message to the device.
Prerequisites
- Apple Developer Account (Paid).
- Configure Push Certificates or Authentication Keys (.p8) in the developer portal.
- “Push Notifications” Capability enabled in Xcode.
Implementation in SwiftUI (App Lifecycle)
SwiftUI manages the app lifecycle, but for Push, we need access to methods that traditionally lived in the AppDelegate. We will use an adaptor.
Step 1: Configure the AppDelegate
class AppDelegate: NSObject, UIApplicationDelegate {
    func application(_ application: UIApplication, didFinishLaunchingWithOptions launchOptions: [UIApplication.LaunchOptionsKey : Any]? = nil) -> Bool {
        // Configure notification delegate
        UNUserNotificationCenter.current().delegate = self
        return true
    }

    // Success registering
    func application(_ application: UIApplication, didRegisterForRemoteNotificationsWithDeviceToken deviceToken: Data) {
        let tokenParts = deviceToken.map { data in String(format: "%02.2hhx", data) }
        let token = tokenParts.joined()
        print("Device Token APNs: \(token)")
        // HERE YOU WOULD SEND THIS TOKEN TO YOUR BACKEND SERVER
    }

    // Failure registering
    func application(_ application: UIApplication, didFailToRegisterForRemoteNotificationsWithError error: Error) {
        print("Failed to register for remote notifications: \(error)")
    }
}

// Extension to handle foreground notifications
extension AppDelegate: UNUserNotificationCenterDelegate {
    func userNotificationCenter(_ center: UNUserNotificationCenter, willPresent notification: UNNotification, withCompletionHandler completionHandler: @escaping (UNNotificationPresentationOptions) -> Void) {
        // Show banner even if app is open
        completionHandler([.banner, .sound, .badge])
    }
}
Step 2: Connect to the App Entry Point
@main
struct MyNotificationApp: App {
    // Inject the AppDelegate
    @UIApplicationDelegateAdaptor(AppDelegate.self) var appDelegate

    var body: some Scene {
        WindowGroup {
            ContentView()
                .onAppear {
                    // Initiate registration process
                    UIApplication.shared.registerForRemoteNotifications()
                }
        }
    }
}
Visual Difference
To the end user, a Push Notification and a Local Notification look exactly the same on the lock screen or as a banner. The difference is purely architectural (the origin of the data).
3. In-App Notifications
Concept and Architecture
This is where confusion often arises. An In-App notification is not a system notification. It does not appear in the iOS Notification Center or on the lock screen.
They are custom views (pop-ups, banners, modals, tooltips) that appear only when the user is actively using the application.
Use Cases
- Confirming an action (e.g., “Item saved to favorites”).
- Validation errors (e.g., “No internet connection”).
- Onboarding (e.g., “Tap here to create your first project”).
- Gamification (e.g., “You earned a badge!”).
Implementation in SwiftUI
Unlike the previous types that use Apple frameworks (UserNotifications), here we have total control over the design using pure SwiftUI code.
We will create a “Toast” (a small banner that appears and disappears).
Step 1: Create the Toast View
struct InAppNotificationView: View {
    let title: String
    let type: NotificationType

    enum NotificationType {
        case success, error, info

        var color: Color {
            switch self {
            case .success: return Color.green
            case .error: return Color.red
            case .info: return Color.blue
            }
        }

        var icon: String {
            switch self {
            case .success: return "checkmark.circle.fill"
            case .error: return "xmark.octagon.fill"
            case .info: return "info.circle.fill"
            }
        }
    }

    var body: some View {
        HStack {
            Image(systemName: type.icon)
            Text(title)
                .font(.subheadline)
                .fontWeight(.medium)
        }
        .padding()
        .background(type.color.opacity(0.9))
        .foregroundColor(.white)
        .cornerRadius(10)
        .shadow(radius: 5)
        .padding(.top, 50) // Space for Dynamic Island or Notch
        .transition(.move(edge: .top).combined(with: .opacity))
    }
}
Step 2: Create a ViewModifier
To make this reusable on any screen, we will use a ViewModifier.
struct InAppNotificationModifier: ViewModifier {
    @Binding var isPresented: Bool
    let title: String
    let type: InAppNotificationView.NotificationType

    func body(content: Content) -> some View {
        ZStack(alignment: .top) {
            content

            if isPresented {
                InAppNotificationView(title: title, type: type)
                    .onAppear {
                        // Auto-hide after 3 seconds
                        DispatchQueue.main.asyncAfter(deadline: .now() + 3) {
                            withAnimation {
                                isPresented = false
                            }
                        }
                    }
                    .zIndex(1) // Ensure it is on top of everything
            }
        }
    }
}

// Extension for easy usage
extension View {
    func inAppNotification(isPresented: Binding<Bool>, title: String, type: InAppNotificationView.NotificationType) -> some View {
        self.modifier(InAppNotificationModifier(isPresented: isPresented, title: title, type: type))
    }
}
Step 3: Usage in the Main View
struct ContentView: View {
    @State private var showSuccess = false

    var body: some View {
        VStack {
            Button("Save Changes") {
                withAnimation {
                    showSuccess = true
                }
            }
            .buttonStyle(.borderedProminent)
        }
        // Inject our in-app notification
        .inAppNotification(isPresented: $showSuccess, title: "Saved successfully", type: .success)
    }
}
4. Summary Comparison Table
To clarify when to use which, observe the following table:
| Feature | Local Notification | Push Notification | In-App Notification |
| Origin | The device itself (Client-side) | Remote Server (Server-side) | The device itself (UI) |
| Connectivity | Internet not required | Requires Internet and APNs | Internet not required |
| Permissions | Requires user permission | Requires user permission | No permission required |
| Visibility | Outside and inside the app | Outside and inside the app | Only inside the app |
| Purpose | Reminders, Alarms, Geofencing | News, Chat, Marketing, Alerts | Feedback, Tutorials, Errors |
| Framework | UserNotifications | UserNotifications + APNs | SwiftUI (View, Overlay) |
5. Best Practices and Strategy
The Golden Rule of Context
The most common mistake is abusing Push Notifications. If the user receives a push for something that provides no immediate value, they will revoke permissions.
- Use Push only for critical and time-sensitive information that happens outside the user’s control (e.g., “Your order has shipped”).
- Use Local for things the user configured (e.g., “Your 8:00 AM alarm”).
Permission Management
Never ask for permission to send notifications (Push or Local) immediately upon opening the app for the first time.
- Let the user navigate.
- Wait for them to perform a related action (e.g., after the user presses “Follow” on a soccer team).
- Show an In-App Notification explaining why they need to enable notifications (“Turn on notifications to know when your team scores”).
- If they accept the In-App prompt, then trigger the system
requestAuthorizationrequest.
In-App Design
In-App notifications should feel like part of the application. Do not use standard iOS alerts (UIAlertController) for everything, as they interrupt the flow. Use smooth animations and elements that do not block the full screen (like the Toast we programmed above) to notify of successes or mild warnings.
Conclusion
Mastering notifications in iOS means understanding the balance between technical infrastructure and User Experience (UX).
- Use Push Notifications when the server has something new to say.
- Use Local Notifications when time or location dictates the alert.
- Use In-App Notifications to communicate with the user while they are already paying attention to you.
With SwiftUI, implementing In-App interfaces is easier and more powerful than ever, while integration with UserNotifications remains robust to ensure your messages arrive, whether from the device or the cloud.
You now have the code and theory to build a complete communication system in your next iOS application.
If you have any questions about this article, please contact me and I will be happy to help you 🙂. You can contact me on my X profile or on my Instagram profile.