For any iOS Developer looking to create unforgettable user experiences, staying up to date with the latest capabilities of the Apple ecosystem is not optional; it is a necessity. Since their introduction, Live Activities have transformed the way users interact with real-time information directly from the Lock Screen and the Dynamic Island.
In this extensive Swift programming tutorial, we will deeply explore what they are, how they work, and most importantly, how you can implement Live Activities in SwiftUI step-by-step using Xcode. Whether you are building your next big delivery app, a sports score tracker, or a cross-training monitor between iOS and watchOS, this guide will provide you with the necessary technical foundations.
1. What are Live Activities?
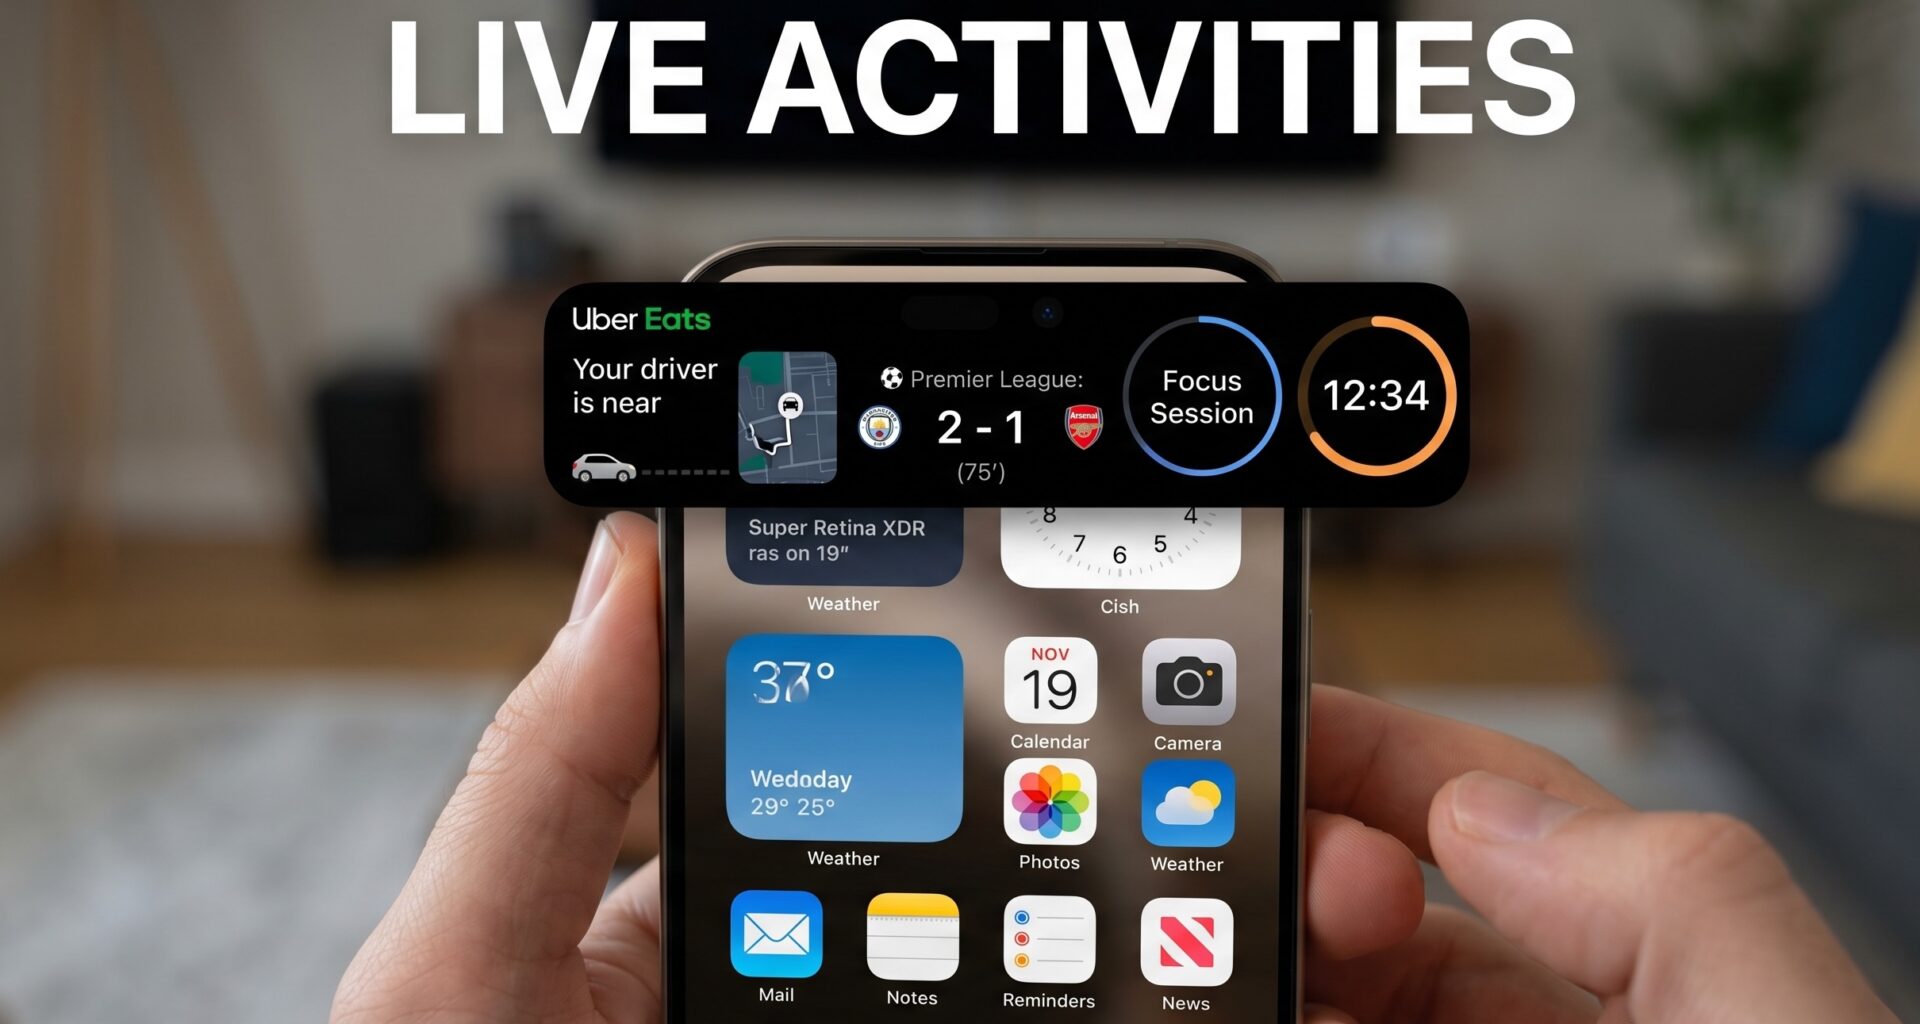
Live Activities are an operating system feature that allows applications to display real-time data and update it persistently on the Lock Screen and the Dynamic Island (on supported devices). Unlike traditional push notifications, which are static and accumulate in a list, a Live Activity is a single interactive (or semi-interactive) element that evolves over time.
Ideal Use Cases
- Sports: Live scores of a football match.
- Delivery: The status of an order (preparing, on the way, delivered).
- Travel and Transportation: Arrival time of an Uber or gate details for a flight.
- Productivity and Health: Focus timers (Pomodoro) or the progress of a live workout.
As an iOS Developer, adopting this feature demonstrates an advanced mastery of SwiftUI and WidgetKit, as Live Activities share architecture with Home Screen widgets.
2. Requirements and Initial Setup in Xcode
To begin this Swift programming tutorial, you need to ensure your development environment is ready.
Technical Requirements
- IDE: Xcode 14.1 or higher (we recommend the latest stable version for full iOS 17/18 support).
- Languages: Swift and SwiftUI.
- Target: Minimum iOS 16.1 (iOS 16.2+ highly recommended due to API changes).
Setting up the project in Xcode
- Create a new project: Open Xcode and create a new iOS “App” project. Name it
LiveActivityTutorial. Make sure to select SwiftUI as the interface. - Modify the Info.plist: The operating system needs to explicitly know that your app has permission to run Live Activities.
- Go to your app’s
Info.plistfile. - Add a new key called
NSSupportsLiveActivities(or search for Supports Live Activities). - Set its value to
YES(Boolean).
- Go to your app’s
- Add a Widget Extension: Live Activities use the WidgetKit infrastructure to render their interface.
- Go to
File > New > Target... - Select Widget Extension.
- Name it
LiveActivityWidget. - Important: Make sure to check the “Include Live Activity” box when creating the target. This will generate the boilerplate code we need.
- Go to
3. Defining the Data Model: ActivityAttributes
The heart of any Live Activity in Swift is the ActivityAttributes protocol. This protocol requires us to divide our data into two strict categories:
- Static Data: Information that will never change while the activity is alive (e.g., the name of a restaurant, the order number, or the teams playing a match).
- Dynamic Data (Content State): Information that will update over time (e.g., the delivery status, the current score, the time remaining).
Let’s create a use case for a pizza delivery app. Create a new Swift file (make sure the Target Membership includes both your main App and the Widget Extension) named PizzaDeliveryAttributes.swift.
import Foundation
import ActivityKit

struct PizzaDeliveryAttributes: ActivityAttributes {

    // 1. Dynamic Data (The state that changes)
    public struct ContentState: Codable, Hashable {
        var driverName: String
        var estimatedDeliveryTime: ClosedRange<Date>
        var deliveryStatus: String
    }

    // 2. Static Data (Constants of the activity)
    var orderNumber: String
    var pizzaName: String
    var restaurantName: String
}
It is crucial to keep the ContentState as lightweight as possible. Apple’s system has strict size limits for updates (generally under 4KB), so you should not send large images or unnecessary data here.
4. Building the Interface: Live Activities in SwiftUI
Now that we have our model, let’s go to the file generated by Xcode inside our Widget Extension, likely named LiveActivityWidgetLiveActivity.swift.
This is where the power of SwiftUI shines. We will design two main views: one for the Lock Screen and another for the Dynamic Island.
The Lock Screen View
The lock screen view is usually a horizontal rectangle or a “banner” card that shows information in an expanded format.
import ActivityKit
import WidgetKit
import SwiftUI

struct LiveActivityWidgetLiveActivity: Widget {
    var body: some WidgetConfiguration {
        ActivityConfiguration(for: PizzaDeliveryAttributes.self) { context in
            // THIS VIEW IS FOR THE LOCK SCREEN
            VStack(alignment: .leading, spacing: 8) {
                HStack {
                    Text("🍕 \(context.attributes.restaurantName)")
                        .font(.headline)
                    Spacer()
                    Text("Order #\(context.attributes.orderNumber)")
                        .font(.caption)
                        .foregroundColor(.gray)
                }

                Text(context.state.deliveryStatus)
                    .font(.title2)
                    .bold()

                HStack {
                    Image(systemName: "car.fill")
                    Text("Driver: \(context.state.driverName)")
                    Spacer()
                    // Native SwiftUI timer for date ranges
                    Text(timerInterval: context.state.estimatedDeliveryTime, countsDown: true)
                        .bold()
                        .foregroundColor(.blue)
                }
            }
            .padding()
            // Configuring the background color to look native
            .activitySystemActionForegroundColor(.white)
            .activityBackgroundTint(Color.black.opacity(0.8))

        } dynamicIsland: { context in
            // DYNAMIC ISLAND CONFIGURATION
            DynamicIsland {
                // Expanded UI (When the user long-presses the island)
                DynamicIslandExpandedRegion(.leading) {
                    Text("🍕 \(context.attributes.pizzaName)")
                        .font(.caption)
                }
                DynamicIslandExpandedRegion(.trailing) {
                    Text(timerInterval: context.state.estimatedDeliveryTime, countsDown: true)
                        .multilineTextAlignment(.trailing)
                        .font(.caption)
                }
                DynamicIslandExpandedRegion(.center) {
                    Text(context.state.deliveryStatus)
                        .font(.headline)
                        .padding(.top, 5)
                }
                DynamicIslandExpandedRegion(.bottom) {
                    HStack {
                        Image(systemName: "car.circle.fill")
                        Text(context.state.driverName)
                    }
                }
            } compactLeading: {
                // Compact UI (Left side of the island when not expanded)
                Text("🍕")
            } compactTrailing: {
                // Compact UI (Right side of the island)
                Text(timerInterval: context.state.estimatedDeliveryTime, countsDown: true)
                    .frame(maxWidth: 25)
            } minimal: {
                // Minimal UI (When there are multiple competing Live Activities)
                Text("🍕")
            }
        }
    }
}
SwiftUI Code Analysis
ActivityConfiguration: It is the building block of the widget. We indicate the type ofActivityAttributesit will respond to.context.attributes: Accesses the static data (e.g.,restaurantName).context.state: Accesses the current dynamic data (e.g.,deliveryStatus).Text(timerInterval:countsDown:): This is a wonderful tool in SwiftUI. You pass it a date range, and SwiftUI handles the countdown automatically, updating the view every second without waking up your app, massively saving battery.DynamicIsland: Requires us to define four views:- Expanded: What is shown on a “Long Press”. You must configure the regions (
.leading,.trailing,.center,.bottom). - Compact Leading: Icon or data to the left of the dynamic notch.
- Compact Trailing: Data to the right.
- Minimal: What is shown in a circular shape if the user has two Live Activities running simultaneously.
- Expanded: What is shown on a “Long Press”. You must configure the regions (
5. The Lifecycle: Start, Update, and End
With our interface ready, we must return to our main app in Xcode. As an iOS Developer, you must carefully handle the activity’s lifecycle using the ActivityKit framework.
We will create a ViewModel (ObservableObject or the new @Observable macro if you use iOS 17+) to handle the business logic.
import Foundation
import ActivityKit
import Combine
class DeliveryViewModel: ObservableObject {
// Store the reference to the current activity
@Published var currentActivity: Activity<PizzaDeliveryAttributes>?
// MARK: - 1. Start the Live Activity
func startDeliveryActivity() {
// Check if Live Activities are enabled on the device
guard ActivityAuthorizationInfo().areActivitiesEnabled else {
print("Live Activities are not enabled by the user.")
return
}
// Create the static data
let attributes = PizzaDeliveryAttributes(
orderNumber: "XYZ-987",
pizzaName: "Family Margherita",
restaurantName: "Luigi's Pizza"
)
// Create the initial dynamic state (e.g., Delivery in 30 minutes)
let futureDate = Calendar.current.date(byAdding: .minute, value: 30, to: Date())!
let initialState = PizzaDeliveryAttributes.ContentState(
driverName: "Mario",
estimatedDeliveryTime: Date()...futureDate,
deliveryStatus: "Preparing your pizza 👨🍳"
)
// Wrap the state in an ActivityContent (Required since iOS 16.2+)
let content = ActivityContent(state: initialState, staleDate: nil)
do {
// Request to start the activity
currentActivity = try Activity.request(
attributes: attributes,
content: content,
pushType: nil // We use nil because we will update from the app. Use .token if updating via Push Notifications.
)
print("Activity started with ID: \(currentActivity?.id ?? "")")
} catch {
print("Error starting Live Activity: \(error.localizedDescription)")
}
}
// MARK: - 2. Update the Live Activity
func updateDeliveryActivity(newStatus: String, newDriver: String? = nil) {
guard let activity = currentActivity else { return }
Task {
// Keep the current driver if a new one is not provided
let currentDriver = activity.content.state.driverName
let estimatedTime = activity.content.state.estimatedDeliveryTime
let updatedState = PizzaDeliveryAttributes.ContentState(
driverName: newDriver ?? currentDriver,
estimatedDeliveryTime: estimatedTime,
deliveryStatus: newStatus
)
let updatedContent = ActivityContent(state: updatedState, staleDate: nil)
// Alert Configuration allows vibrating the device or dynamically expanding the island upon update
var alertConfig = AlertConfiguration(
title: "Order Update",
body: newStatus,
sound: .default
)
await activity.update(updatedContent, alertConfiguration: alertConfig)
print("Activity successfully updated.")
}
}
// MARK: - 3. End the Live Activity
func endDeliveryActivity() {
guard let activity = currentActivity else { return }
Task {
let finalState = PizzaDeliveryAttributes.ContentState(
driverName: activity.content.state.driverName,
estimatedDeliveryTime: activity.content.state.estimatedDeliveryTime,
deliveryStatus: "Pizza Delivered! Enjoy. 🍕"
)
let finalContent = ActivityContent(state: finalState, staleDate: nil)
// DismissalPolicy.default leaves the notification on screen for a while until the user clears it.
// DismissalPolicy.immediate removes it instantly.
await activity.end(finalContent, dismissalPolicy: .default)
self.currentActivity = nil
print("Activity ended.")
}
}
}
Integration in the Main SwiftUI View
Finally, to trigger this logic in our SwiftUI app:
import SwiftUI

struct ContentView: View {
    @StateObject private var viewModel = DeliveryViewModel()

    var body: some View {
        VStack(spacing: 20) {
            Text("Pizza Delivery App")
                .font(.largeTitle)
                .bold()

            Button(action: {
                viewModel.startDeliveryActivity()
            }) {
                Text("Place Order")
                    .frame(maxWidth: .infinity)
                    .padding()
                    .background(Color.blue)
                    .foregroundColor(.white)
                    .cornerRadius(10)
            }

            Button(action: {
                viewModel.updateDeliveryActivity(newStatus: "On the way 🚗", newDriver: "Luigi")
            }) {
                Text("Simulate: Order on the way")
                    .frame(maxWidth: .infinity)
                    .padding()
                    .background(Color.orange)
                    .foregroundColor(.white)
                    .cornerRadius(10)
            }

            Button(action: {
                viewModel.endDeliveryActivity()
            }) {
                Text("Simulate: Order Delivered")
                    .frame(maxWidth: .infinity)
                    .padding()
                    .background(Color.green)
                    .foregroundColor(.white)
                    .cornerRadius(10)
            }
        }
        .padding()
    }
}
6. Live Activities in the Ecosystem: iOS, macOS, and watchOS
Modern Swift programming is all about creating universal code. However, as an iOS Developer, it is fundamental to understand where and how Live Activities materialize across different platforms through Xcode.
On iOS and iPadOS
This is the native environment par excellence. On the iPhone, activities interact fluidly with the Dynamic Island and the Lock Screen. With iPadOS 17, Apple introduced Live Activities to the iPad’s large lock screen, providing a much broader canvas. Your code written in SwiftUI for the lock screen will work perfectly here, but you must ensure your fonts and layouts are scalable.
On watchOS (Smart Stack)
With watchOS 10 and especially watchOS 11, Live Activities made the leap to the wrist. You don’t need to rewrite a complete watchOS app for them to work. The Apple Watch intelligently uses the code from your Widget Extension (with a compact design) and projects the live activity directly into the user’s Smart Stack.
If the user raises their wrist, they can see their pizza is arriving in 5 minutes without needing to pull their iPhone out of their pocket. To optimize this in Xcode, make sure to test your Widget in the Apple Watch simulator and avoid overly dense text.
On macOS
Currently, macOS Sonoma introduced the ability to place iPhone widgets on your Mac desktop thanks to Continuity. Although the WidgetKit infrastructure is shared, macOS does not render transient “Live Activities” in an equivalent to the Dynamic Island. However, by mastering the underlying architecture of Widgets with Swift, you’ll be one step away from creating static or interactive desktop widgets for macOS using the same mental model.
7. Remote Updates: The Power of Apple Push Notification Service (APNs)
In our previous Swift programming example, we updated the activity from within the open app itself. However, in a production environment, if your app is closed or the user locks the phone, the app cannot execute code to update the delivery status.
To solve this, Apple allows Live Activities to be updated remotely via Push Notifications.
- Request a Push Token: When starting the activity, change
pushType: niltopushType: .token. - Send the Token to the Server: You capture
activity.pushTokenUpdatesusing an asynchronous loop and send this unique token (which changes periodically) to your backend (Node.js, Python, Firebase, etc.). - The Backend sends the payload: Your server makes an HTTP/2 POST request to Apple’s servers (APNs) sending a structured JSON that exactly matches the data types of your
ContentState. The iPhone’s operating system receives this payload and updates the SwiftUI UI immediately, without waking up your application.
8. Best Practices and Limitations to Consider
As an expert iOS Developer, mastering the technique is not enough; you also have to follow Apple’s Human Interface Guidelines (HIG) to ensure your app is approved and loved by users.
Design and UX
- Contrast and Color: Use
activityBackgroundTintto ensure your text is legible, but remember that the system darkens colors to maintain readability on the Lock Screen in Always-On Display mode. - Do not use them for advertising: Apple is extremely strict about this. A Live Activity must have a clear beginning and end related to an event triggered by the user. Do not use it to announce “We have a 20% discount today!”.
- Lightweight Images: If you need to load images (like the driver’s photo), pass them as a
Datatype in yourContentStateor load them from the device’s disk, but the total payload cannot exceed 4KB.
Energy Management (Battery)
- Update only when necessary: If the driver is stuck in traffic for 10 minutes, do not send an update every second changing their GPS position in meters. Update based on “events” or state change milestones.
- Leverage the native environment: Use the internal SwiftUI timer (
Text(timerInterval:)) instead of forcing manual updates to count down seconds.
Error Handling in Xcode
- Active Activity Limits: The operating system allows a maximum number of activities running at the same time (usually around 5 per device and 1 or 2 from the same app visible at once in the island). Always check if
ActivityAuthorizationInfo().areActivitiesEnabledis true before starting your logic. - Simulation: Xcode offers excellent previews (#Preview) to view the different states of the Dynamic Island without needing to compile all the time. Use them to validate the compact, expanded, and minimal designs.
Conclusion
Integrating Live Activities in SwiftUI represents one of the highest returns on investment in modern Swift programming. It provides unparalleled visibility to your application directly from the lock screen and the Dynamic Island, keeping users informed and engaged without forcing them to constantly open the app.