


The Apple ecosystem has matured into a convergence where the lines between iOS, iPadOS, and macOS are increasingly blurred. As an iOS Developer, your goal is no longer just to create an app for the iPhone, but to design universal experiences that adapt to the user’s device. One of the most critical interactions for productivity and fluidity is, undoubtedly, the ability to drag and drop.
In this article, written especially for the technical community, we will explore step by step how to implement drag and drop in SwiftUI. We will see how Swift programming has evolved to make this easier than ever, how to configure your project in Xcode, and how to write code in Swift that works harmoniously on iOS and macOS. In addition, we will address the reality of watchOS and how to handle its limitations.
1. The Evolution: From NSItemProvider to Transferable
Historically, implementing drag and drop required dealing with UIKit or AppKit and the NSItemProvider class. This involved handling complex delegates, registering UTI (Uniform Type Identifiers) data types, and writing a lot of boilerplate code that was prone to errors.
Fortunately, the Swift team completely redesigned this experience. Starting with iOS 16 and macOS 13, Apple introduced the Transferable protocol. This protocol leverages the strongly typed Swift type system to declaratively define how your data models can be serialized, shared, and reconstructed.
Why does Transferable change the game?
- Type-Safety: The compiler verifies that you are dragging and dropping the correct types.
- Declarative: Fits perfectly with the SwiftUI philosophy.
- Unified: The same protocol is used for drag and drop, copy and paste (Clipboard), and the Share Sheet.
2. Cross-Platform Realities: iOS, macOS, and watchOS
Before opening Xcode, every iOS Developer must understand the user interface conventions of each platform:
- macOS: Drag and drop is the primary interaction. Users use the cursor to drag text, images, and components between windows without thinking.
- iOS / iPadOS: Requires a conscious gesture. The user must perform a long press on an element until it visually “lifts” off the screen, and then move it. On iPad, this action is vital for Split View mode.
- watchOS: Here we must be pragmatic. An Apple Watch screen is not designed for complex back-and-forth drag and drop gestures. Although SwiftUI is cross-platform, drag modifiers are not available on watchOS. In your code, you will use compiler directives (like
#if os(iOS) || os(macOS)) to provide an alternative UI on the watch.
3. Preparing Your Environment in Xcode
For this Swift programming tutorial, we will build a small visual task manager (Kanban style).
- Open Xcode (make sure to use version 14 or higher).
- Select Create a new Xcode project.
- In the Multiplatform tab, choose App.
- Make sure to select SwiftUI as the interface and Swift as the language.
- Name your project, for example,
TaskDragDropApp.
4. Defining the Data Model (Transferable)
For the operating system to know how to move our information, our model must conform to the Transferable protocol.
Create a new Swift file named TaskModel.swift:
import Foundation
import CoreTransferable

// Define the columns of our Kanban board
enum TaskColumn: String, Codable, CaseIterable {
    case todo = "To Do"
    case inProgress = "In Progress"
    case done = "Done"
}

// Our main data model
struct TaskItem: Identifiable, Codable, Equatable {
    var id: UUID = UUID()
    var title: String
    var column: TaskColumn
}

// Make the model Transferable
extension TaskItem: Transferable {
    static var transferRepresentation: some TransferRepresentation {
        // CodableRepresentation automatically converts our structure to JSON
        // allowing the OS to safely move it through memory.
        CodableRepresentation(contentType: .json)
    }
}
The Magic of CodableRepresentation
By using CodableRepresentation, we tell Swift to take our TaskItem structure, convert it into JSON data when the user starts dragging it, and decode it back into a TaskItem when the user drops it. This entire process is managed by SwiftUI in the background.
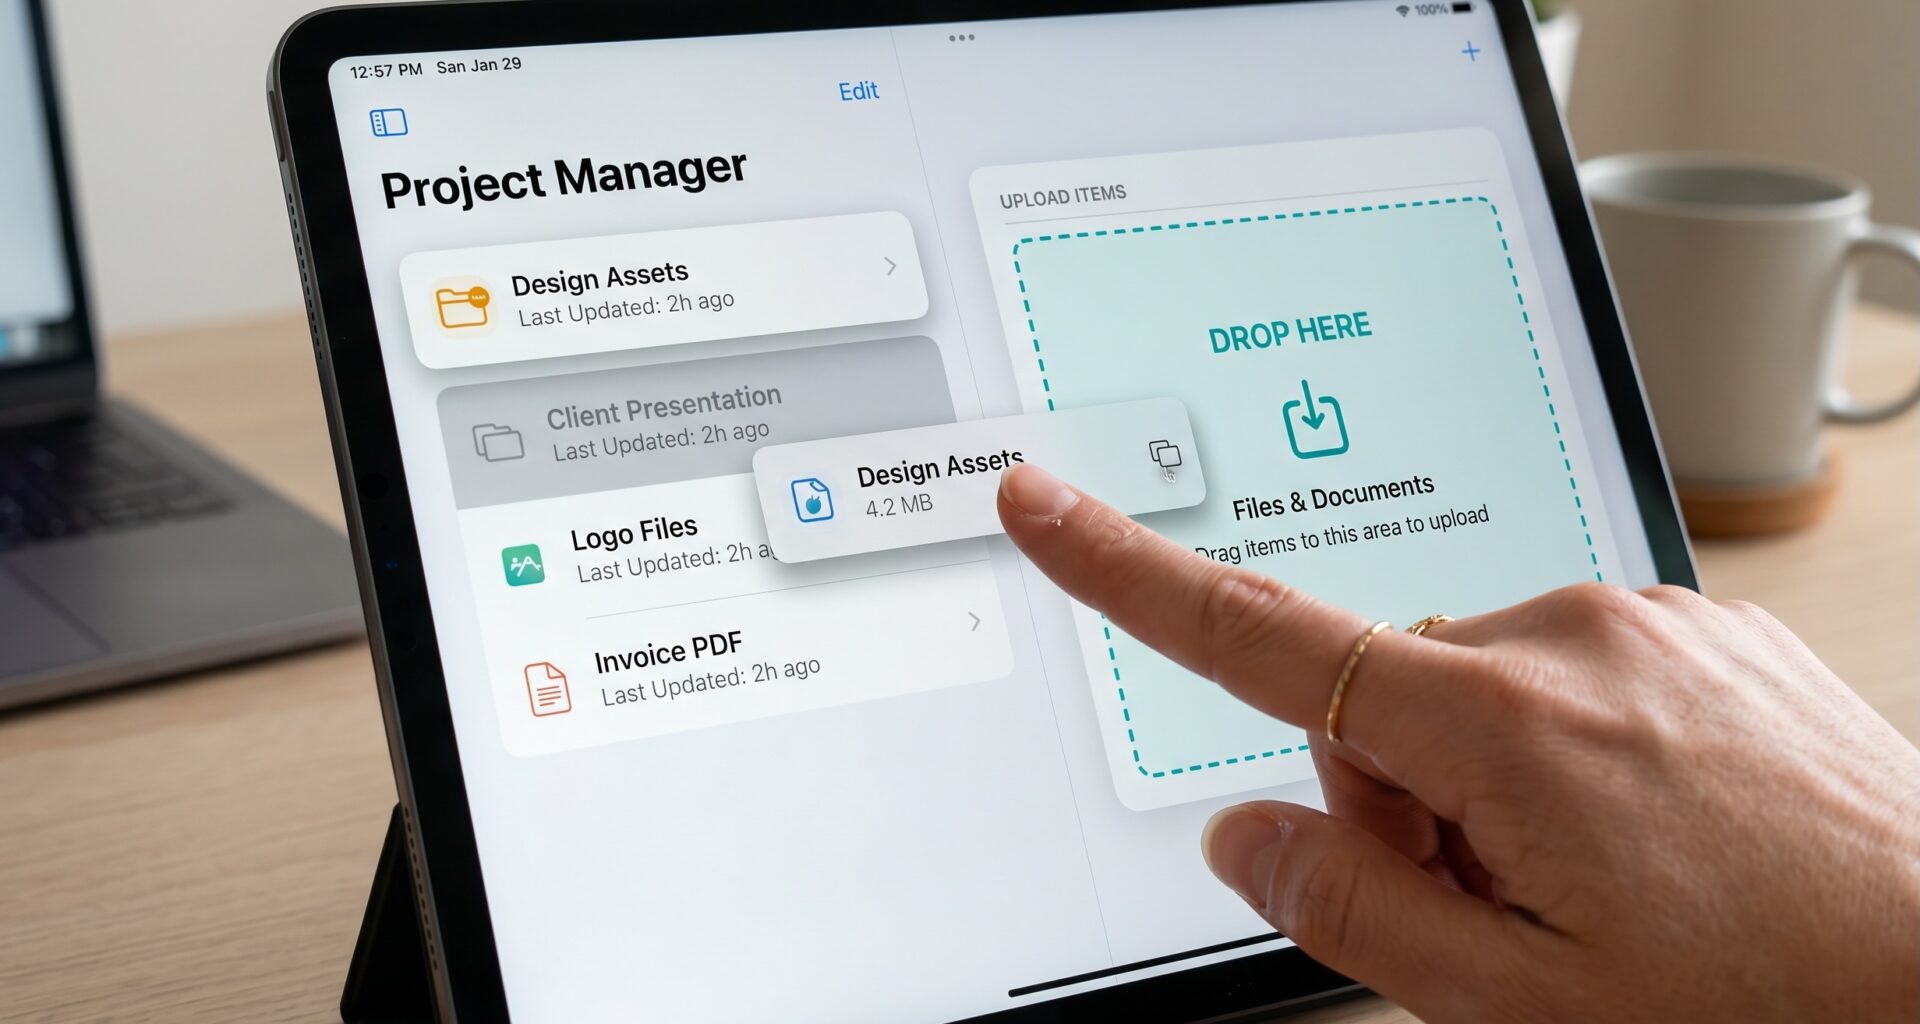
5. Implementing the .draggable Modifier
Now we are going to create the visual interface for our task. We want the user to be able to grab this card with their finger (or mouse) and move it.
Open your ContentView.swift file and add the following view:
import SwiftUI

struct TaskCardView: View {
    let task: TaskItem

    var body: some View {
        Text(task.title)
            .font(.subheadline)
            .padding()
            .frame(maxWidth: .infinity, alignment: .leading)
            .background(Color.blue.opacity(0.1))
            .cornerRadius(8)
            // 1. Here we declare that the view is draggable
            .draggable(task) {
                // 2. This is the custom preview shown while dragging
                Text(task.title)
                    .padding()
                    .background(Color.blue.opacity(0.3))
                    .cornerRadius(8)
                    .shadow(radius: 5)
            }
    }
}
Code Analysis:
The .draggable() modifier is the cornerstone of drag and drop in SwiftUI. It takes two parameters: the payload (the TaskItem object itself) and a closure that defines how the element will look while “flying” across the screen. If you omit the preview closure, SwiftUI will create an automatic snapshot of the original view.
6. Implementing the Drop Zone: .dropDestination
A draggable view is useless without a place to drop it. This is where the .dropDestination modifier comes in. Let’s create the columns of our Kanban board.
struct KanbanColumnView: View {
    let column: TaskColumn
    @Binding var allTasks: [TaskItem]

    // State to know if the user is dragging something over this column
    @State private var isTargeted: Bool = false

    // Filtered tasks for this particular column
    var columnTasks: [TaskItem] {
        allTasks.filter { $0.column == column }
    }

    var body: some View {
        VStack(alignment: .leading) {
            Text(column.rawValue)
                .font(.headline)
                .padding(.bottom, 5)

            ScrollView {
                VStack(spacing: 10) {
                    ForEach(columnTasks) { task in
                        TaskCardView(task: task)
                    }
                }
                .padding(.vertical, 10)
                .frame(maxWidth: .infinity, minHeight: 200, alignment: .top)
            }
            .background(isTargeted ? Color.green.opacity(0.1) : Color.gray.opacity(0.05))
            .cornerRadius(10)

            // THE DROP RECEIVER
            .dropDestination(for: TaskItem.self) { droppedTasks, location in
                // Action upon drop
                return handleDrop(tasks: droppedTasks)
            } isTargeted: { targeted in
                // Visual feedback while dragging over
                withAnimation {
                    isTargeted = targeted
                }
            }
        }
        .padding(.horizontal, 5)
    }

    // Logic to update the main state
    private func handleDrop(tasks: [TaskItem]) -> Bool {
        for task in tasks {
            if let index = allTasks.firstIndex(where: { $0.id == task.id }) {
                allTasks[index].column = self.column
            }
        }
        return true // Returns true if the drop was successful
    }
}
Understanding dropDestination
In Swift programming, safety is paramount. The .dropDestination(for: TaskItem.self) modifier tells Xcode and the operating system that this area will only accept items that are exactly of the TaskItem type.
The isTargeted parameter is fantastic for the user experience (UX). It triggers automatically when the pointer or finger enters or leaves the drop zone, allowing us to change the background color (from gray to light green in our example) to indicate to the user: “Yes, you can drop that here!”.
7. Integrating Everything in the Main View
Finally, let’s put all the pieces together in our ContentView. We will use compilation macros to ensure our code compiles correctly if you decide to add a watchOS Target to your Xcode project.
struct ContentView: View {
    @State private var tasks: [TaskItem] = [
        TaskItem(title: "Design UI in SwiftUI", column: .todo),
        TaskItem(title: "Research Transferable", column: .inProgress),
        TaskItem(title: "Read Apple documentation", column: .done)
    ]

    var body: some View {
        NavigationStack {
            #if os(watchOS)
            // Alternative for watchOS where Drag and Drop is not native
            List(tasks) { task in
                VStack(alignment: .leading) {
                    Text(task.title).font(.headline)
                    Text("Status: \(task.column.rawValue)").font(.caption)
                }
            }
            .navigationTitle("My Tasks")

            #else
            // Interface for iOS and macOS
            HStack(alignment: .top, spacing: 15) {
                ForEach(TaskColumn.allCases, id: \.self) { column in
                    KanbanColumnView(column: column, allTasks: $tasks)
                }
            }
            .padding()
            .navigationTitle("Cross-Platform Kanban Board")
            #endif
        }
    }
}

#Preview {
    ContentView()
}
8. Advanced Considerations and Performance
As an iOS Developer, you must be prepared for more complex scenarios beyond moving simple text or lightweight JSON structures.
Handling Heavy Files (FileRepresentation)
If your SwiftUI app needs to support dragging high-resolution (4K) images or heavy PDF documents, you should not use CodableRepresentation, as it could block the Main Thread and impact the app’s performance.
Instead, Swift offers FileRepresentation or DataRepresentation. These representations operate asynchronously. The operating system provides a temporary file on the disk, and your application copies it safely without saturating the RAM.
Reordering in Lists
If you only need the user to reorder items vertically within the same list (without moving them to different containers), SwiftUI has a built-in shortcut for the List component using .onMove(perform:). It is much simpler than implementing dropDestination manually for simple array reordering.
Conclusion
Implementing drag and drop in SwiftUI is no longer a tedious task reserved for the most experienced developers with UIKit. Thanks to the elegance of the Transferable protocol, modern Swift programming allows you to express complex intentions with just a couple of modifiers.