The Apple Watch is not a tiny iPhone. This is the first lesson, and the most painful one, that novice developers learn. It is an intimate device, designed for “glances”—interactions measuring in seconds, not minutes.
With the arrival of watchOS 10, Apple completely redefined the navigation and design paradigm. Apps are now more colorful, utilize full-screen layouts, and rely less on complex hierarchies. If you were waiting for the perfect moment to jump into watch development, it is now.
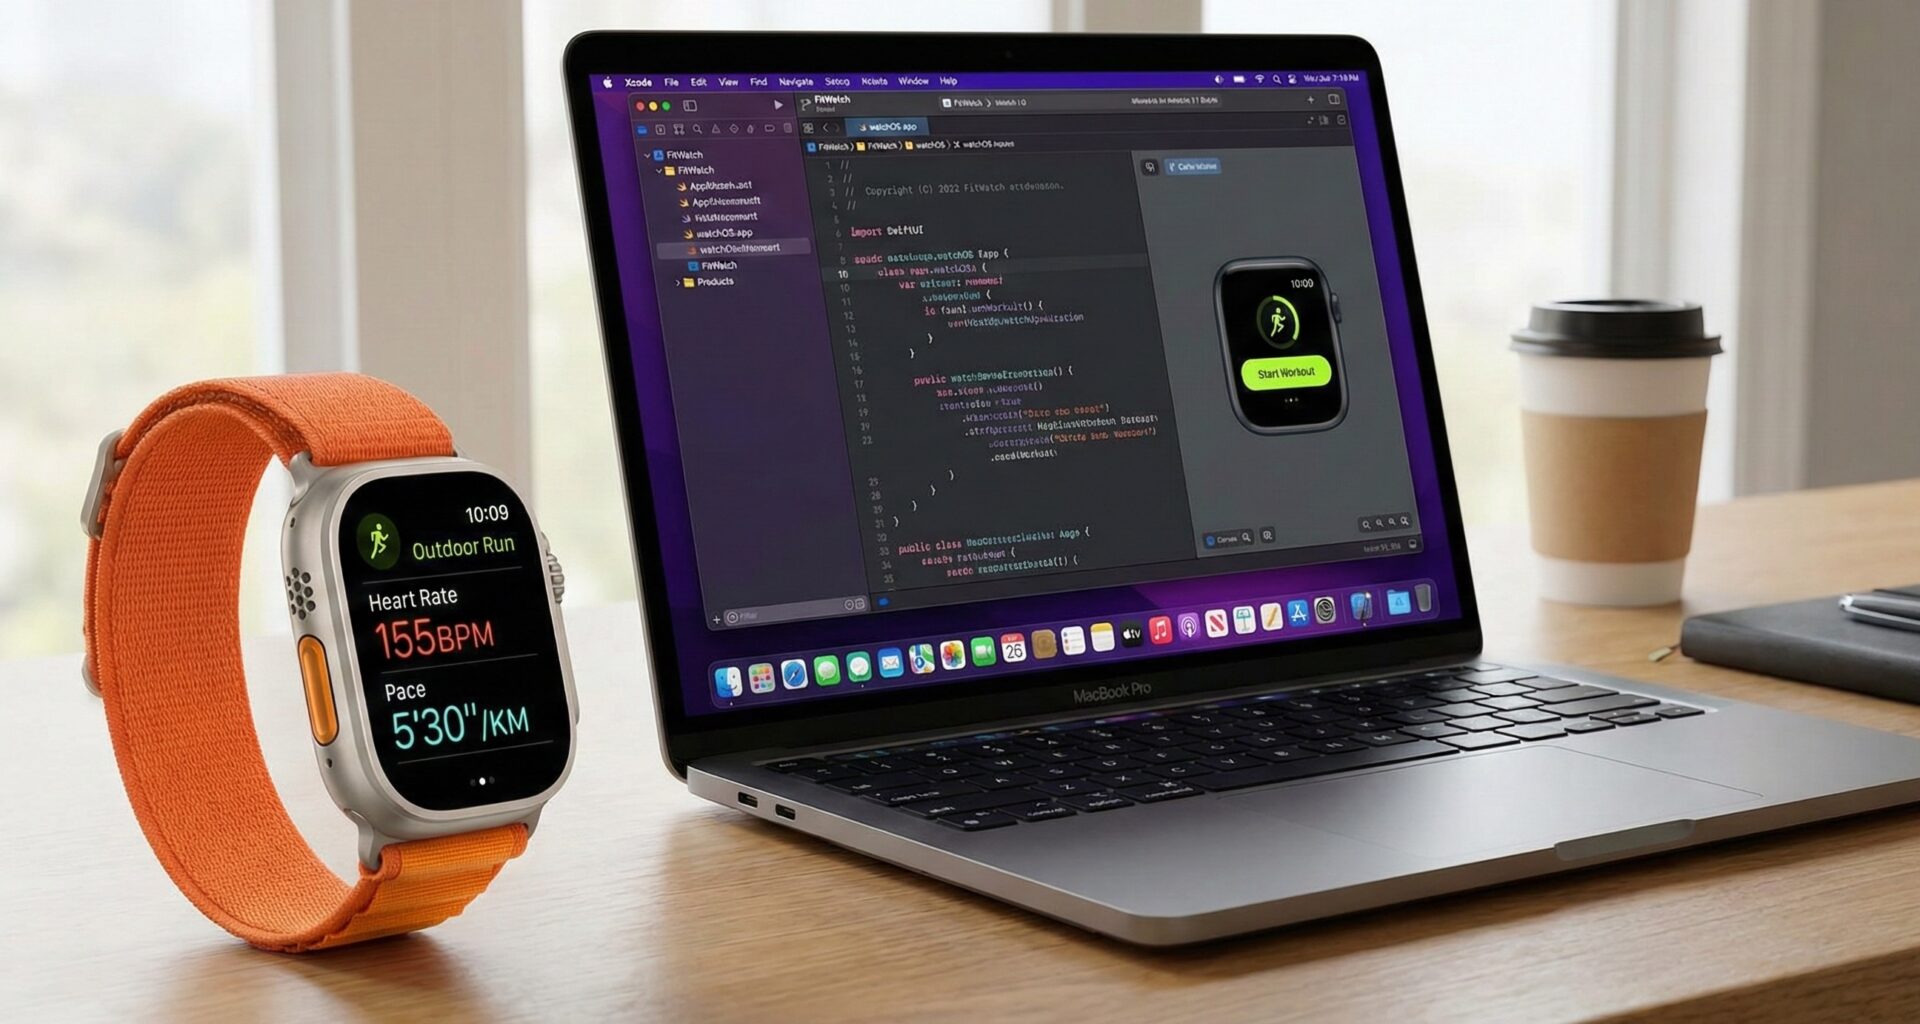
In this tutorial, we are going to build an app for Apple Watch from scratch, but not a simple “Hello World.” We are going to architect a Workout and Health app, exploring HealthKit, the Digital Crown, Complications, and connectivity with the iPhone.
CHAPTER 1: Setup and Environment Philosophy
1.1. Independent App vs. Companion App
Until a few years ago, an Apple Watch app was a “parasite” of the iPhone. The code ran on the phone, and the interface was projected onto the watch. That is dead.
Today you have two options when opening Xcode:
- Watch App for iOS App: Creates an iOS target and a watchOS target. Both are installed together. Ideal if your app needs complex configuration on the phone (banking, social media).
- Watch App: A totally independent application. It is downloaded from the Watch App Store. It can work without the user having an iPhone nearby (thanks to LTE/Wi-Fi).
For this tutorial, we will choose option 1, as most commercial apps require an iOS counterpart to visualize historical data.
1.2. The Anatomy of a watchOS Project
When creating the project, you will notice a distinct structure:
- iOS Target: Your standard phone app.
- Watch App Target: Contains the view code and Assets (images, colors) that live on the watch.
In SwiftUI, the entry point is identical to iOS:
@main
struct WatchApp: App {
    var body: some Scene {
        WindowGroup {
            HomeView()
        }
    }
}
1.3. The 10-Second Rule
Before writing a line of code, etch this into your mind: If the user takes more than 10 seconds to get value from your app, you have failed.
- Bad design: Open app -> Menu -> Settings -> Select -> View data.
- Good design: Open app -> View data.
CHAPTER 2: UI Design in the watchOS 10 Era
Apple redesigned watchOS 10 based on two pillars: Legibility and Corner Usage.
2.1. The NavigationStack on the Wrist
Unlike iOS, where vertical space is infinite, on the Watch we want paginated information or very concise lists.
struct HomeView: View {
    var body: some View {
        NavigationStack {
            List {
                NavigationLink(value: "start") {
                    Label("Start", systemImage: "play.fill")
                        .font(.title3)
                        .padding()
                }
                .listRowBackground(
                    RoundedRectangle(cornerRadius: 20)
                        .fill(Color.blue.gradient)
                )

                NavigationLink(value: "history") {
                    Label("History", systemImage: "list.bullet")
                }
            }
            .navigationTitle("FitWatch")
            .navigationDestination(for: String.self) { value in
                if value == "start" {
                    WorkoutView()
                } else {
                    HistoryView()
                }
            }
        }
    }
}
2.2. Containers and Colors
In watchOS 10+, we no longer use pure black backgrounds for everything. Developers are encouraged to use gradients that fill the screen to indicate state (e.g., Green for active, Red for stop).
The .containerBackground modifier is new and essential:
// Example of a colorful detail view
struct WorkoutView: View {
    var body: some View {
        VStack {
            Text("154 BPM")
                .font(.system(size: 60, weight: .bold, design: .rounded))
            Text("Intense Cardio")
                .font(.caption)
        }
        .containerBackground(Color.orange.gradient, for: .navigation)
    }
}
CHAPTER 3: Watch-Specific Inputs
The Watch doesn’t have a keyboard (well, the Series 7+ has a small one, but don’t rely on it for long inputs). Your main inputs are:
3.1. The Digital Crown
It is the most precise tool on the device. In SwiftUI, we read its rotation with .digitalCrownRotation.
struct VolumeControlView: View {
    @State private var volume: Double = 5.0

    var body: some View {
        VStack {
            Text("Volume")
            Text("\(Int(volume))")
                .font(.largeTitle)
                .foregroundStyle(.green)

            Gauge(value: volume, in: 0...10) {
                EmptyView()
            }
            .gaugeStyle(.accessoryLinearCapacity)
        }
        // $volume: The variable to modify
        // from/through: Range of values
        // by: Steps per haptic "click"
        // sensitivity: How much rotation is needed
        .focusable()
        .digitalCrownRotation($volume, from: 0, through: 10, by: 1, sensitivity: .low)
    }
}
3.2. Haptic Feedback
The Watch has the Taptic Engine. You must use it to confirm actions, as the user is often not looking at the screen when pressing a button while running.
import WatchKit

func triggerHaptic() {
    WKInterfaceDevice.current().play(.success)
}
Use it sparingly: .success, .failure, .click. Do not abuse .notification or the user will feel like their wrist is vibrating for no reason.
CHAPTER 4: The Heart of the Beast – HealthKit
For a Watch app, HealthKit is not optional. It is the system that securely stores and reads biometric data.
4.1. Privacy Configuration
First, in your Info.plist file (of the Watch Target), you must add:
NSHealthShareUsageDescription: “We need to read your heart rate to display it on screen.”NSHealthUpdateUsageDescription: “We need to save your workouts.”
4.2. The HealthManager
We will create a singleton class to handle the dirty logic.
import HealthKit

class HealthManager: ObservableObject {
    static let shared = HealthManager()
    let healthStore = HKHealthStore()

    @Published var heartRate: Double = 0

    private init() {}

    func requestAuthorization() {
        // What we want to read
        let readTypes: Set = [
            HKQuantityType.quantityType(forIdentifier: .heartRate)!,
            HKQuantityType.quantityType(forIdentifier: .activeEnergyBurned)!
        ]

        // What we want to write
        let shareTypes: Set = [
            HKObjectType.workoutType()
        ]

        healthStore.requestAuthorization(toShare: shareTypes, read: readTypes) { success, error in
            if success {
                print("Authorized!")
            }
        }
    }
}
4.3. Starting a Workout Session (HKWorkoutSession)
This is where the magic happens. A workout session tells the Watch: “Keep the sensors on and the app in the foreground.”
// Inside HealthManager
var session: HKWorkoutSession?
var builder: HKLiveWorkoutBuilder?

func startWorkout() {
    let configuration = HKWorkoutConfiguration()
    configuration.activityType = .running
    configuration.locationType = .outdoor

    do {
        session = try HKWorkoutSession(healthStore: healthStore, configuration: configuration)
        builder = session?.associatedWorkoutBuilder()

        builder?.dataSource = HKLiveWorkoutDataSource(healthStore: healthStore, workoutConfiguration: configuration)

        session?.startActivity(with: Date())
        builder?.beginCollection(withStart: Date()) { (success, error) in
            // Data collection has started
        }
    } catch {
        print("Error starting workout: \(error)")
    }
}
CHAPTER 5: Lifecycle and “Always On”
The lifecycle in watchOS is brutal. The system tries to suspend your app as soon as the user lowers their wrist.
5.1. Handling State
We use scenePhase just like in iOS, but with different implications.
@Environment(\.scenePhase) var scenePhase

.onChange(of: scenePhase) { newPhase in
    if newPhase == .inactive {
        // User lowered their wrist.
        // If we are not in an active Workout, the app will freeze soon.
    }
}
5.2. Always On Display (AOD)
Since Series 5, the screen can stay on. Your app needs to adapt to this by dimming content and hiding sensitive data.
SwiftUI handles much of this automatically, but you can use the .isLuminanceReduced environment variable.
@Environment(\.isLuminanceReduced) var isLuminanceReduced
var body: some View {
TimelineView(.periodic(from: .now, by: 1.0)) { context in
VStack {
if isLuminanceReduced {
// Simplified version to save battery and avoid screen burn-in
Text("🏃♂️ Running")
Text("10:05") // Simple time without seconds
} else {
// Full UI with animations
AnimatedHeartRateGraph()
Text("10:05:32")
}
}
}
}CHAPTER 6: iPhone Connectivity (WatchConnectivity)
Sometimes you need to send heavy data to the iPhone or receive configuration. WCSession is your bridge.
6.1. Delegate Configuration
You must implement WCSessionDelegate on both the iPhone and the Watch.
import WatchConnectivity

class PhoneConnector: NSObject, WCSessionDelegate, ObservableObject {
    var session: WCSession

    init(session: WCSession = .default) {
        self.session = session
        super.init()
        self.session.delegate = self
        self.session.activate()
    }

    func session(_ session: WCSession, activationDidCompleteWith state: WCSessionActivationState, error: Error?) {
        // Session ready
    }

    // Method to receive data from iPhone
    func session(_ session: WCSession, didReceiveMessage message: [String : Any]) {
        DispatchQueue.main.async {
            if let name = message["userName"] as? String {
                print("User received: \(name)")
            }
        }
    }

    // Stubs required by protocol (even if not used on Watch)
    func sessionDidBecomeInactive(_ session: WCSession) {}
    func sessionDidDeactivate(_ session: WCSession) {}
}
6.2. Transfer Modes
- sendMessage: Immediate. Use it for real-time actions (e.g., pausing music). Fails if the counterpart is not reachable.
- transferUserInfo: Background queue. Sent when the system allows. Ideal for syncing non-urgent data.
- updateApplicationContext: The “current state.” Replaces previous data. Ideal for keeping settings in sync (e.g., Metric vs. Imperial units).
CHAPTER 7: Complications – The Holy Grail of Engagement
Complications are the small widgets on the watch face. They are the main reason users love the Apple Watch.
7.1. ClockKit vs. WidgetKit
Formerly we used ClockKit. Since watchOS 9, we use WidgetKit, the same framework as in iOS. This simplifies everything.
7.2. Creating a Watch Widget
Add a new Target to your project of type “Watch Complication Extension.”
struct FitWatchComplication: Widget {
    let kind: String = "FitWatchComplication"

    var body: some WidgetConfiguration {
        StaticConfiguration(kind: kind, provider: Provider()) { entry in
            ComplicationView(entry: entry)
        }
        .configurationDisplayName("My Steps")
        .description("Shows your current steps.")
        // Define which families we support (Corners, Circular, Rectangular)
        .supportedFamilies([.accessoryCircular, .accessoryRectangular, .accessoryCorner])
    }
}
7.3. Adapting the View
You must use WidgetFamily to know how to draw.
struct ComplicationView: View {
    @Environment(\.widgetFamily) var family
    var entry: SimpleEntry

    var body: some View {
        switch family {
        case .accessoryCircular:
            ZStack {
                Circle().stroke(lineWidth: 4)
                Text("\(entry.steps)")
            }
        case .accessoryRectangular:
            HStack {
                Image(systemName: "figure.walk")
                VStack(alignment: .leading) {
                    Text("Today")
                        .font(.caption2)
                    Text("\(entry.steps) steps")
                        .font(.headline)
                }
            }
        case .accessoryCorner:
            Text("\(entry.steps)")
                .widgetLabel {
                    ProgressView(value: 0.5)
                }
        default:
            Text("Fit")
        }
    }
}
CHAPTER 8: Deployment and Optimization
8.1. Binary Size
The Apple Watch has limited storage and slow connections.
- Remove unused Assets.
- Compress png/jpg images or use vectors (SVG/PDF).
- Avoid heavy third-party frameworks if you can do it natively.
8.2. App Store Screenshots
This is a common pain point. Xcode includes simulators for 41mm and 45mm (Series 7/8/9) and 49mm (Ultra).
- Mandatory: You must upload screenshots specific to the Watch Series (rounded rectangular screen) and optionally for the Ultra.
- Design: Ensure screenshots show the colored container and high-contrast interface.
Conclusion and Next Steps
You have come a long way. We have gone from setting up a project to reading heart rate and drawing widgets on the watch face.
Developing for watchOS is an exercise in minimalism and efficiency. It forces you to distill your product to its purest essence. It’s not about how much time the user spends in your app, but how much value you give them in the shortest time possible.