


In the Apple development ecosystem, there are two main types of data architectures: database-based applications (like a To-Do app or a social network) and document-based applications.
Think of Pages, Keynote, TextEdit, or Sketch. They don’t manage a central database hidden from the user; they work with files. The user creates a file, names it, chooses where to save it (iCloud Drive, locally, on a server), and shares it.
For years, implementing UIDocument (on iOS) or NSDocument (on macOS) was a titanic task full of boilerplate code and complex error handling. With the arrival of SwiftUI, Apple gifted us the FileDocument protocol and the DocumentGroupstructure, simplifying this process by 90%.
In this tutorial, you will learn how to build a cross-platform application that manages its own files, defines custom data types, and integrates natively with the system file explorer, a document-based app in SwiftUI.
Part 1: Theory – What is a Document-Based App?
Before writing code, we must understand the mindset shift.
- The File System is King: Your app doesn’t own the data; the user does. The user decides if the file lives in “My Documents” or a shared Dropbox folder.
- Sandboxing: On iOS, your app cannot read just any file. It can only read files the user explicitly opens or creates within the app.
- Serialization: Your main job is to convert your Swift objects (Structs/Classes) into binary data (
Data) that can be written to disk, and vice versa.
The Three Pillars of SwiftUI
To achieve this, SwiftUI gives us three tools:
- UTType (Uniform Type Identifier): This is your file’s ID card. It defines who it is (e.g.,
com.mycompany.amazingnotes) and what extension it uses (e.g.,.supernote). - FileDocument Protocol: The contract that teaches your data structure how to package itself (
encode) and unpackage itself (decode). - DocumentGroup: The replacement for
WindowGroupin yourAppfile. It automatically handles opening the file selection window on iOS or window/tab management on macOS.
Part 2: Project Setup in Xcode
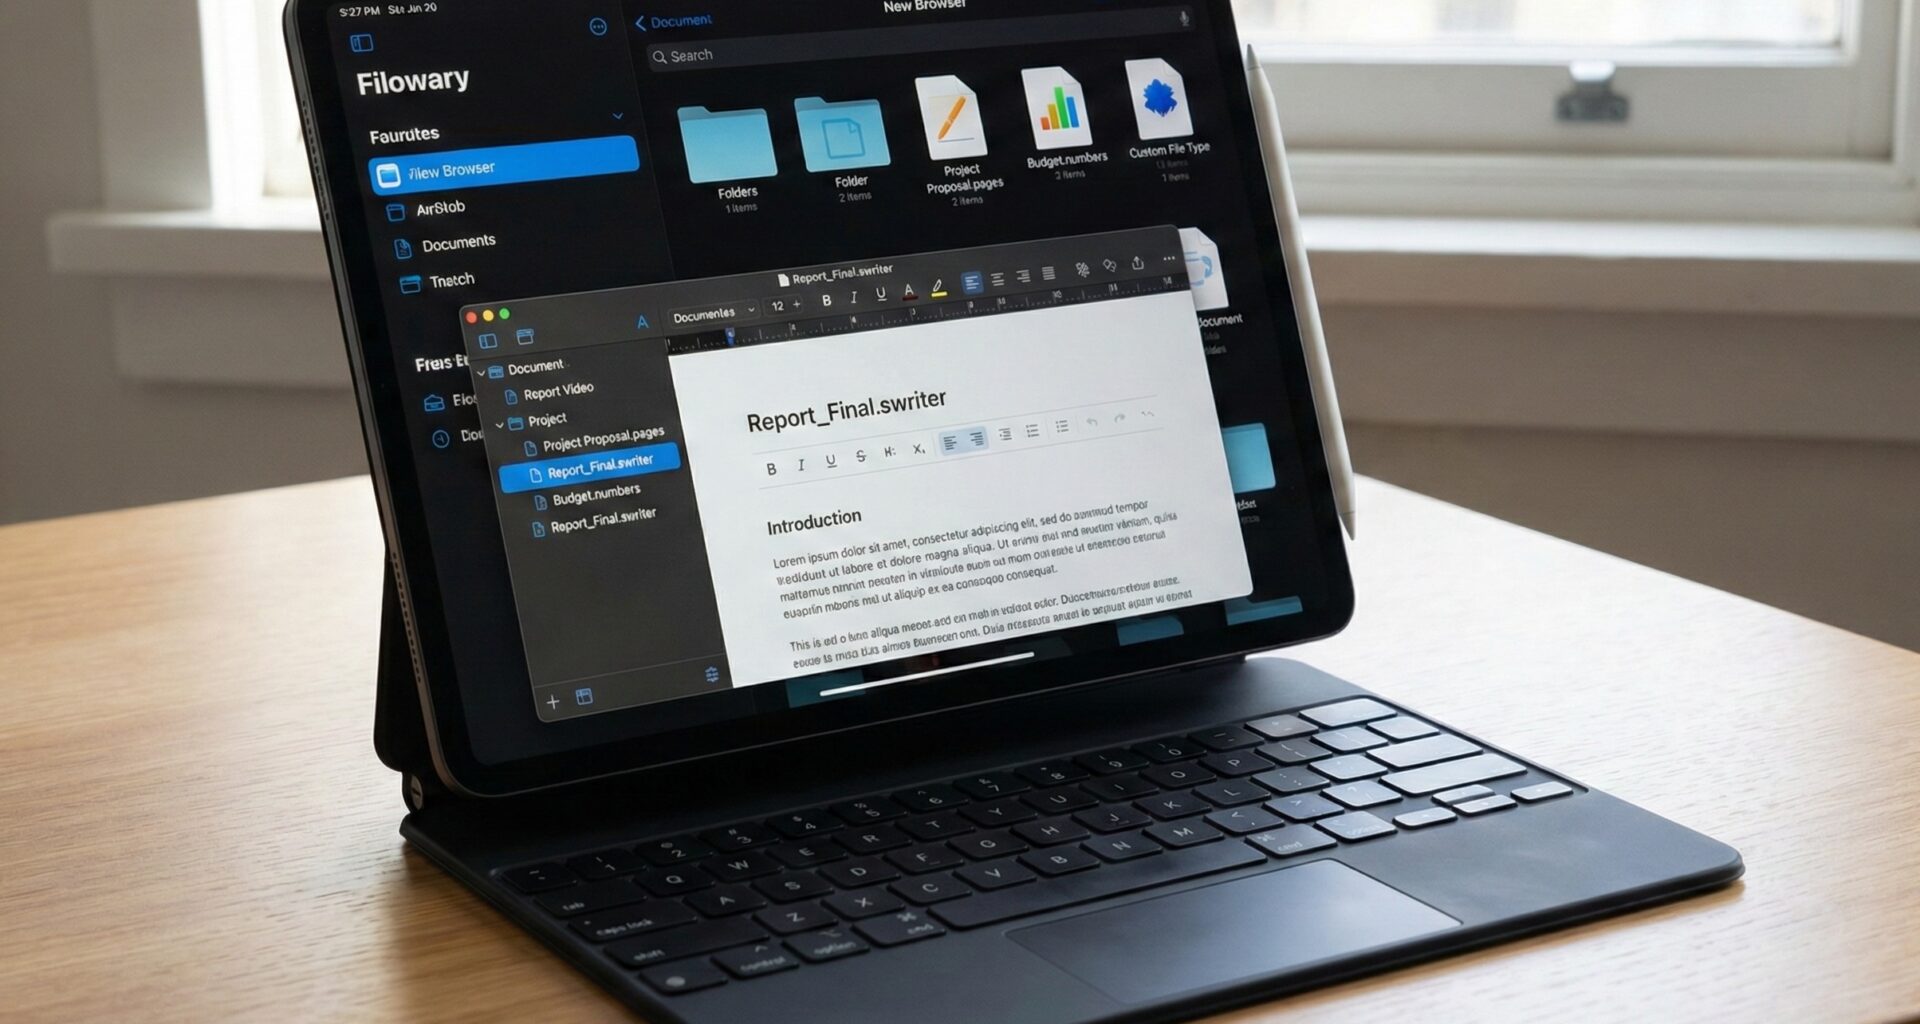
We are going to create a fictional rich text editor called “SwiftWriter”.
- Open Xcode and select Create New Project.
- Go to the Multiplatform tab and select Document App.
- Note: You could select a normal “App” and configure it manually, but the “Document App” template saves us from configuring the initial
Entitlements.
- Note: You could select a normal “App” and configure it manually, but the “Document App” template saves us from configuring the initial
- Name the project “SwiftWriter”.
- Ensure the Interface is SwiftUI and the Language is Swift.
When creating the project, you will see that Xcode has already generated a ContentView, a SwiftWriterApp, and a basic model. We are going to delete the basic model to build it from scratch and understand it.
Part 3: Defining the File Identity (UTType)
The operating system needs to know that a .swriter file belongs to your application. This is done via Uniform Type Identifiers.
Step 1: Import the Framework
Create a new Swift file called UTType+Extension.swift.
import UniformTypeIdentifiers

extension UTType {
    // We define our custom type
    static var swiftWriterDoc: UTType {
        // The identifier must be unique (reverse domain notation)
        UTType(importedAs: "com.yourcompany.swiftwriter.doc")
    }
}
Step 2: Configure Info.plist
This is the step where most fail. Code is not enough; you must register the type in the project.
- Go to the Target of your app -> Info tab.
- Look for the Exported Type Identifiers section.
- Add a new item:
- Description: SwiftWriter Document
- Identifier:
com.yourcompany.swiftwriter.doc(Must match the code above). - Conforms To:
public.json(If we are saving as JSON) orpublic.data. For this tutorial, we will use JSON. - Extensions:
swriter
Part 4: Creating the Data Model (FileDocument)
Now we will create the structure that holds the data. We will use FileDocument for structs (value types), which is ideal for SwiftUI and thread safety.
Create a file called SwiftWriterDocument.swift.
import SwiftUI
import UniformTypeIdentifiers

// 1. The data model must be Codable to facilitate serialization
struct WriterContent: Codable {
    var text: String = ""
    var creationDate: Date = Date()
    var fontSize: Double = 12.0
}

// 2. We conform to FileDocument
struct SwiftWriterDocument: FileDocument {

    // Property that stores our data
    var content: WriterContent

    // A. Define which file types this document can read
    static var readableContentTypes: [UTType] {
        return [.swiftWriterDoc]
    }

    // B. Initializer for a new (empty) document
    init() {
        self.content = WriterContent()
    }

    // C. Initializer for READING (Opening file)
    init(configuration: ReadConfiguration) throws {
        // We try to get the data from the file
        guard let data = configuration.file.regularFileContents else {
            throw CocoaError(.fileReadCorruptFile)
        }

        // We decode the JSON to our Struct
        self.content = try JSONDecoder().decode(WriterContent.self, from: data)
    }

    // D. Method for WRITING (Saving file)
    func fileWrapper(configuration: WriteConfiguration) throws -> FileWrapper {
        // We encode our Struct to JSON
        let data = try JSONEncoder().encode(content)

        // Return a FileWrapper (the container holding the bytes)
        return FileWrapper(regularFileWithContents: data)
    }
}
Code Analysis:
- ReadConfiguration: SwiftUI gives us access to the file on disk. We read the bytes and use
JSONDecoder. - WriteConfiguration: SwiftUI asks us for a
FileWrapper. We convert our struct to JSON and wrap it. - Advantage: SwiftUI automatically handles auto-save, version control (on macOS), and cloud saving (iCloud). You only worry about the JSON.
Part 5: The User Interface (Binding)
Here is where we connect the document with the screen. The key is that the view does not own the document; rather, it receives a Binding to it.
Open ContentView.swift:
import SwiftUI

struct ContentView: View {
    // We receive the document as a Binding.
    // This allows edits to flow up to the DocumentGroup
    @Binding var document: SwiftWriterDocument

    var body: some View {
        VStack {
            HStack {
                Text("Font size: \(Int(document.content.fontSize))")
                Slider(value: $document.content.fontSize, in: 8...36)
            }
            .padding()

            // TextEditor binds directly to the document content
            TextEditor(text: $document.content.text)
                .font(.system(size: document.content.fontSize))
                .padding()
                .background(Color.gray.opacity(0.1))
                .cornerRadius(8)
        }
        .padding()
        #if os(iOS)
        .navigationTitle("Editor")
        .navigationBarTitleDisplayMode(.inline)
        #endif
    }
}
Part 6: The Entry Point (DocumentGroup)
Finally, we connect everything in the main App file (SwiftWriterApp.swift).
import SwiftUI

@main
struct SwiftWriterApp: App {
    var body: some Scene {
        // Instead of WindowGroup, we use DocumentGroup
        DocumentGroup(newDocument: SwiftWriterDocument()) { file in
            // file.document is a Binding<SwiftWriterDocument>
            // file.$document gives us the Binding needed by ContentView
            ContentView(document: file.$document)
        }
    }
}
What is happening here?
- On iOS: When launching the app, you will automatically see the File Manager (similar to the “Files” app). You can navigate iCloud Drive, create folders, and tap the “+” button to create a new document. Tapping a file opens
ContentView. - On macOS: The app launches empty (or with an “Open” dialog). You have a native menu: File -> New, File -> Save, etc. It supports multiple windows and tabs automatically.
Part 7: Platform Differences (iOS vs macOS vs watchOS)
Developing a Document App is a cross-platform dream, but there are nuances.
iOS and iPadOS
The DocumentGroup in iOS wraps your view in a navigation structure. It automatically provides the “Close” (or “Back”) button that saves and closes the document.
- Challenge: Keyboard and toolbar management. You must ensure you use
.toolbarto add document-specific actions.
macOS
Here FileDocument shines. You get free support for:
- Undo/Redo: If you switch your struct to
ReferenceFileDocument(classes instead of structs) and useUndoManager, you getCmd+Zfor free. With structs (FileDocument) it’s a bit more manual, but the versioned save system works. - Represented Filename: The file icon in the window title bar (proxy icon) works natively. You can drag that icon into an email to attach the file.
watchOS: The Exception
Here we must be honest. watchOS does not support DocumentGroup in the same way as iOS or macOS. There is no “Finder” or “Files” on the Apple Watch where the user navigates folders and opens a JSON.
How is it handled on watchOS? If you want your app to work on the watch, you cannot use the “Document App” template as-is for the watch target.
- Sync: You will use
WatchConnectivityto send the file content from the iPhone to the Watch. - View: On the Watch, you will create a normal
WindowGroupdisplaying the received data. - Editing: The Watch usually acts as a viewer or a remote control. If you allow editing (voice dictation, for example), you must send the data back to the iPhone so it updates the physical file.
Technical Note: Although watchOS has a local file system for caches, it is not exposed to the user as “Documents”.
Part 8: Advanced Topics – FileWrapper and Directories
So far we have saved a single JSON file (a regularFile). But what if your document is complex? Imagine your .swriterdocument needs to contain text AND several attached images.
For this, the FileWrapper can be a Directory.
// Conceptual example for Bundles (Packages)
func fileWrapper(configuration: WriteConfiguration) throws -> FileWrapper {
    let rootDirectory = FileWrapper(directoryWithFileWrappers: [:])

    // 1. We add the data JSON
    let jsonData = try JSONEncoder().encode(content)
    let jsonWrapper = FileWrapper(regularFileWithContents: jsonData)
    jsonWrapper.preferredFilename = "data.json"
    rootDirectory.addFileWrapper(jsonWrapper)

    // 2. We add an image (if it existed in our model)
    if let imageData = content.imageData {
        let imageWrapper = FileWrapper(regularFileWithContents: imageData)
        imageWrapper.preferredFilename = "image.png"
        rootDirectory.addFileWrapper(imageWrapper)
    }

    return rootDirectory
}
In the Info.plist, you should mark your exported type with the property LSTypeIsPackage (Is a Package) as YES. To the user, in Finder/Files, it will look like a single file, but in reality, it is a folder (like .pages or .key files).
Part 9: Troubleshooting Common Issues
1. “The file appears gray and I can’t open it”
This is error number 1. It means the operating system does not associate the file extension with your application.
- Solution: Thoroughly check the
Info.plist. Ensure theIdentifierin “Exported Type Identifiers” is identical to the one you defined in yourUTTypeextension. EnsureConforms Toincludespublic.contentorpublic.data.
2. “Changes are not saving”
SwiftUI automatically saves when it detects a change in the Binding and the app enters the background or the document closes.
- Solution: Verify that your
contentmodel is aValue Type(Struct) and that you are modifying the actual Binding ($document.content.text) and not a disconnected local@Statecopy.
3. Version Conflict in iCloud
If you edit the file on Mac and iPad at the same time, what happens? FileDocument attempts to resolve it, but for robust control, you will need to implement custom conflict resolution logic by examining configuration.file.fileURL and file versions, though this is material for an advanced tutorial.
Conclusion
Creating a Document Based App in SwiftUI is one of the most powerful skills you can acquire as an Apple developer. It allows you to create professional tools that feel native, respect user privacy (sandbox), and integrate perfectly with iCloud Drive.
We have moved from having to write hundreds of lines of code delegating methods in UIKit to an elegant declarative structure where you define your data, your file type, and your view.
If you have any questions about this article, please contact me and I will be happy to help you 🙂. You can contact me on my X profile or on my Instagram profile.