


Introduction
Sharing content is one of the most important features of any modern application. From sending an image via WhatsApp to sharing a link on Twitter or saving a file to iCloud, users expect apps to let them distribute their content easily and natively.
Apple provides an elegant and powerful solution for this task in SwiftUI: ShareLink. Introduced in iOS 16, macOS 13, and later versions, ShareLink allows you to integrate the system share sheet with just a few lines of code while respecting the user experience of the Apple ecosystem.
In this tutorial you will learn step by step how to use ShareLink in SwiftUI to share text, URLs, images, files, and custom content from an app built with Xcode. We will also cover best practices, real-world use cases, and how to customize the sharing experience.
What is ShareLink?
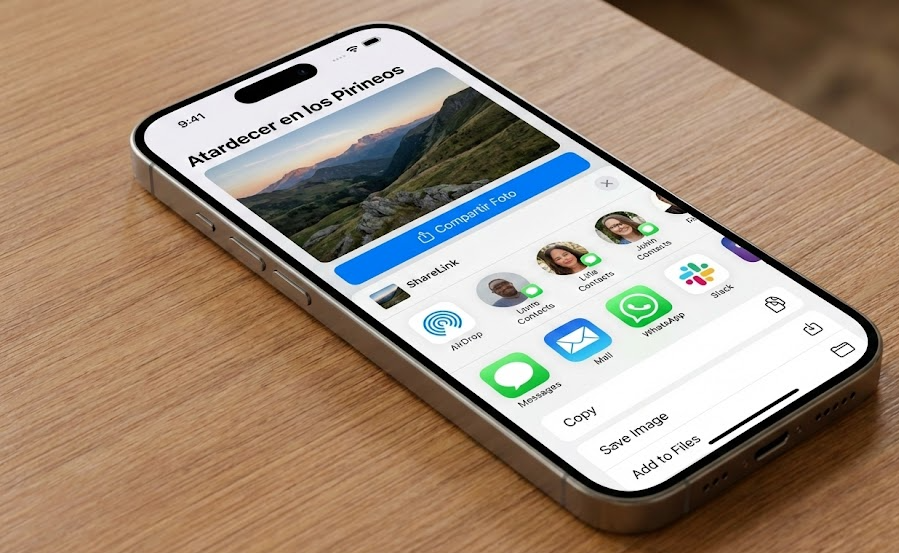
ShareLink is a native SwiftUI view that presents the system share sheet (the same panel you see when tapping the Share button in Safari or Photos). It allows users to send content via:
- AirDrop
- Messages
- WhatsApp, Telegram, etc.
- Save to Files
- Social networks
- Third-party apps
The main advantages of ShareLink are:
- No need to use UIKit
- Fully integrated with SwiftUI
- Works across Apple platforms
- Supports any kind of shareable content
Project Requirements
Before starting, make sure you have:
- Xcode 14 or later
- iOS 16+, macOS 13+, iPadOS 16+
- A SwiftUI project
To create a new project:
- Open Xcode
- Click File → New → Project
- Select App
- Interface: SwiftUI
- Language: Swift
Sharing Text with ShareLink
The simplest use case is sharing plain text.
import SwiftUI

struct ContentView: View {
    let text = "Hello, this is a text shared from my SwiftUI app"

    var body: some View {
        VStack {
            ShareLink(item: text) {
                Label("Share text", systemImage: "square.and.arrow.up")
            }
            .padding()
        }
    }
}
When the user taps the button, the system share sheet appears with the text ready to be shared.
Sharing URLs
One of the most common use cases is sharing links.
let url = URL(string: "https://www.apple.com")!

ShareLink(item: url) {
    Label("Share link", systemImage: "link")
}
The system will recognize it as a URL and show the appropriate options.
Sharing Images
To share images you can use UIImage.
if let image = UIImage(named: "photo") {
    ShareLink(item: image) {
        Label("Share image", systemImage: "photo")
    }
}
Users can then save the image, AirDrop it, or share it on social media.
Sharing Multiple Items
You can share multiple items at once.
let text = "Check this out"
let url = URL(string: "https://www.apple.com")!

ShareLink(items: [text, url]) {
    Label("Share everything", systemImage: "square.and.arrow.up")
}
Adding a Subject
You can provide a subject line for Mail and compatible apps.
ShareLink(item: url, subject: Text("Recommended website")) {
    Label("Share", systemImage: "square.and.arrow.up")
}
Sharing Files
You can share local files such as PDFs.
if let pdfURL = Bundle.main.url(forResource: "manual", withExtension: "pdf") {
    ShareLink(item: pdfURL) {
        Label("Share PDF", systemImage: "doc")
    }
}
Creating Custom Shareable Content
You can make your own data types shareable by conforming to Transferable.
struct Article: Transferable {
    let title: String
    let content: String

    static var transferRepresentation: some TransferRepresentation {
        ProxyRepresentation { article in
            "\(article.title)\n\n\(article.content)"
        }
    }
}
ShareLink in Lists
List(articles) { article in
    HStack {
        Text(article.title)
        Spacer()
        ShareLink(item: article) {
            Image(systemName: "square.and.arrow.up")
        }
    }
}
Real App Example: Notes App
struct Note: Identifiable, Transferable {
    let id = UUID()
    let text: String

    static var transferRepresentation: some TransferRepresentation {
        ProxyRepresentation { note in
            note.text
        }
    }
}
Custom Button Design
ShareLink(item: url) {
    HStack {
        Image(systemName: "paperplane.fill")
        Text("Send")
    }
    .padding()
    .background(Color.blue)
    .foregroundColor(.white)
    .cornerRadius(10)
}
iPad and macOS Support
ShareLink automatically adapts to:
- iPhone
- iPad
- macOS
Accessibility
ShareLink supports:
- VoiceOver
- Dynamic Type
- High contrast
- System languages
Common Mistakes
- Sharing unsupported types
- Trying to share remote URLs
- Not testing on a real device
Best Practices
- Use system icons
- Share meaningful content
- Provide clear titles
- Test across apps
Conclusion
ShareLink is one of the most powerful modern SwiftUI APIs. It allows you to integrate Apple’s system sharing with minimal code and a great user experience.
Adding sharing to your app makes it more useful, more social, and more professional.
If you have any questions about this article, please contact me and I will be happy to help you 🙂. You can contact me on my X profile or on my Instagram profile.


