


A Complete Tutorial with Xcode, Best Practices, and Real-World Examples
Introduction
App Store reviews are one of the most influential factors in the success of an iOS application. A good rating not only builds trust with potential users but also improves an app’s visibility in the App Store thanks to App Store Optimization (ASO).
Apple is well aware of this importance and therefore provides official APIs that allow developers to request reviews directly from within the app, without forcing users to leave it. With the introduction of StoreKit 2, Apple modernized these APIs to better align with Swift, SwiftUI, and asynchronous programming.
In this tutorial, you will learn:
- What StoreKit 2 is and how it differs from the classic StoreKit
- How to request app reviews using StoreKit 2 in SwiftUI
- When and how to ask for reviews without annoying users
- How to control the frequency of review requests
- Practical examples and recommended patterns
- Common mistakes to avoid
This article is intended for developers with basic SwiftUI knowledge who want to implement a modern, correct, and App Store–compliant review request flow.
1. What Is StoreKit 2?
StoreKit 2 is the evolution of Apple’s StoreKit framework, introduced starting with iOS 15. It is designed to:
- Use modern APIs based on
async/await - Integrate more naturally with SwiftUI
- Simplify the management of purchases, transactions, and App Store events
- Provide a more consistent and type-safe developer experience
Although StoreKit 2 is best known for handling In-App Purchases, it also maintains and modernizes related App Store functionality, including requesting app reviews.
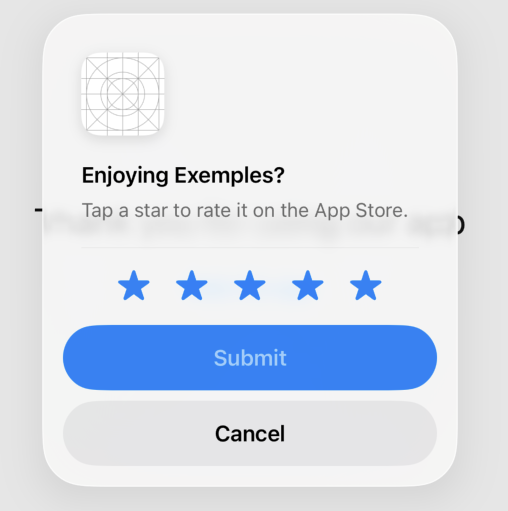
2. How the iOS Review System Works
Before writing any code, it is important to understand how Apple’s review system works.
Key Characteristics
- The system displays a native review dialog
- Users can rate the app and write a review
- The process happens without leaving the app
- Apple controls when and how often the dialog appears
Important Limitations
- Apple allows the dialog to appear up to three times per year per user
- You cannot force the dialog to appear
- There is no callback indicating whether the user submitted a review
- The request may do nothing if the system decides not to show the dialog
In other words, requesting a review is a suggestion to the system, not a command.
3. Apple’s Rules for Requesting Reviews
Apple enforces strict rules around review requests. Violating them may lead to App Store rejection.
Allowed
- Requesting reviews using the official API
- Asking after a positive user interaction
- Making the request polite and optional
Prohibited
- Offering rewards in exchange for reviews
- Forcing redirection to the App Store
- Blocking features unless a review is submitted
- Displaying aggressive or repetitive prompts
4. Project Requirements
To use StoreKit 2, you need:
- Xcode 14 or later (Xcode 15+ recommended)
- iOS 15 or later
- A SwiftUI-based project
No special configuration is required in App Store Connect to request reviews.
5. Importing StoreKit in SwiftUI
In any file where you plan to request a review, import StoreKit:
import StoreKitWith StoreKit 2, the review functionality remains system-based but integrates cleanly with SwiftUI.
6. The Recommended SwiftUI Approach: requestReview
Even with StoreKit 2, Apple recommends using the SwiftUI environment value to request reviews.
Accessing the Environment
@Environment(\.requestReview) var requestReviewThis approach is fully compatible with StoreKit 2 and is the cleanest solution for SwiftUI apps.
7. Requesting a Review (Basic Usage)
The simplest way to request a review is to call:
requestReview()This tells the system that your app would like to show the review dialog—if the system allows it.
8. Minimal SwiftUI Example
import SwiftUI
import StoreKit

struct ContentView: View {

    @Environment(\.requestReview) var requestReview

    var body: some View {
        VStack(spacing: 24) {
            Text("Thank you for using our app")
                .font(.title)

            Button("Rate the app") {
                requestReview()
            }
        }
        .padding()
    }
}
While this works, it is not recommended for production because it does not control timing or frequency.
9. Choosing the Right Moment to Ask for a Review
One of the most important factors in getting positive reviews is timing.
Bad Moments
- Immediately after launching the app
- Before the user has done anything
- During a critical task
Good Moments
- After completing a task
- When reaching a milestone
- After several successful uses
- At the end of a positive experience
10. Controlling Frequency with UserDefaults
Although Apple enforces its own limits, it is good practice to implement your own internal control.
Example Usage Counter
struct ReviewManager {

    static func incrementUsage() {
        let count = UserDefaults.standard.integer(forKey: "usageCount")
        UserDefaults.standard.set(count + 1, forKey: "usageCount")
    }

    static func shouldRequestReview() -> Bool {
        let count = UserDefaults.standard.integer(forKey: "usageCount")
        return count == 5 || count == 20
    }
}
11. Integrating with SwiftUI and StoreKit 2
struct TaskCompletedView: View {

    @Environment(\.requestReview) var requestReview

    var body: some View {
        Text("Task completed!")
            .onAppear {
                ReviewManager.incrementUsage()

                if ReviewManager.shouldRequestReview() {
                    requestReview()
                }
            }
    }
}
This ensures the review request only appears after a positive user action.
12. Asking If the User Likes the App First
A common strategy is to filter the experience before requesting a review.
Recommended Flow
- “Are you enjoying the app?”
- If “Yes” → request a review
- If “No” → offer private feedback
13. Example with a SwiftUI Alert
@State private var showAlert = false

.alert("Are you enjoying the app?", isPresented: $showAlert) {
    Button("Yes") {
        requestReview()
    }
    Button("No", role: .cancel) {
        // Show feedback form
    }
}
This improves review quality and reduces negative public feedback.
14. StoreKit 2 and Window Scenes
In more advanced cases, you may need direct access to the active window scene:
if let scene = UIApplication.shared.connectedScenes
    .first(where: { $0.activationState == .foregroundActive }) as? UIWindowScene {

    SKStoreReviewController.requestReview(in: scene)
}
This approach is still valid and compatible with StoreKit 2, although SwiftUI usually abstracts this away.
15. Requesting a Review vs. Opening the App Store
In-App Request (Recommended)
- Native dialog
- Better UX
- Controlled by the system
Manual App Store Redirect
Only use this when the user explicitly requests it:
let url = URL(string: "https://apps.apple.com/app/idYOUR_APP_ID?action=write-review")!
UIApplication.shared.open(url)
16. Testing in Simulator, TestFlight, and Production
Simulator
- Review dialog may not appear
- Not reliable for testing
TestFlight
- More realistic behavior
- Ideal for validating the flow
Production
- Depends on user history
- Final decision is made by the system
17. Common Mistakes to Avoid
– Requesting reviews repeatedly
– Showing aggressive alerts
– Forcing App Store redirects
– Asking for reviews before delivering value
– Ignoring user experience
18. UX Best Practices
- Use friendly, respectful language
- Make the request optional
- Respect the user’s choice
- Do not immediately ask again after a rejection
19. Benefits of Using StoreKit 2
- Modern, safe APIs
- Better SwiftUI integration
- Future-proof architecture
- Cleaner and more maintainable code
While review requests themselves have not changed dramatically, StoreKit 2 fits naturally into modern SwiftUI app architectures.
20. Conclusion
Requesting app reviews in a SwiftUI application using StoreKit 2 is technically simple, but it requires careful UX design and respect for Apple’s guidelines. Apple provides clear boundaries to protect users, and following them not only prevents App Store rejections but also builds long-term trust.
If you request reviews:
- At the right time
- With moderation
- Using official APIs
- With user experience in mind
you will naturally receive better ratings over time.
A great app does not beg for reviews — it earns them.
If you have any questions about this article, please contact me and I will be happy to help you 🙂. You can contact me on my X profile or on my Instagram profile.