



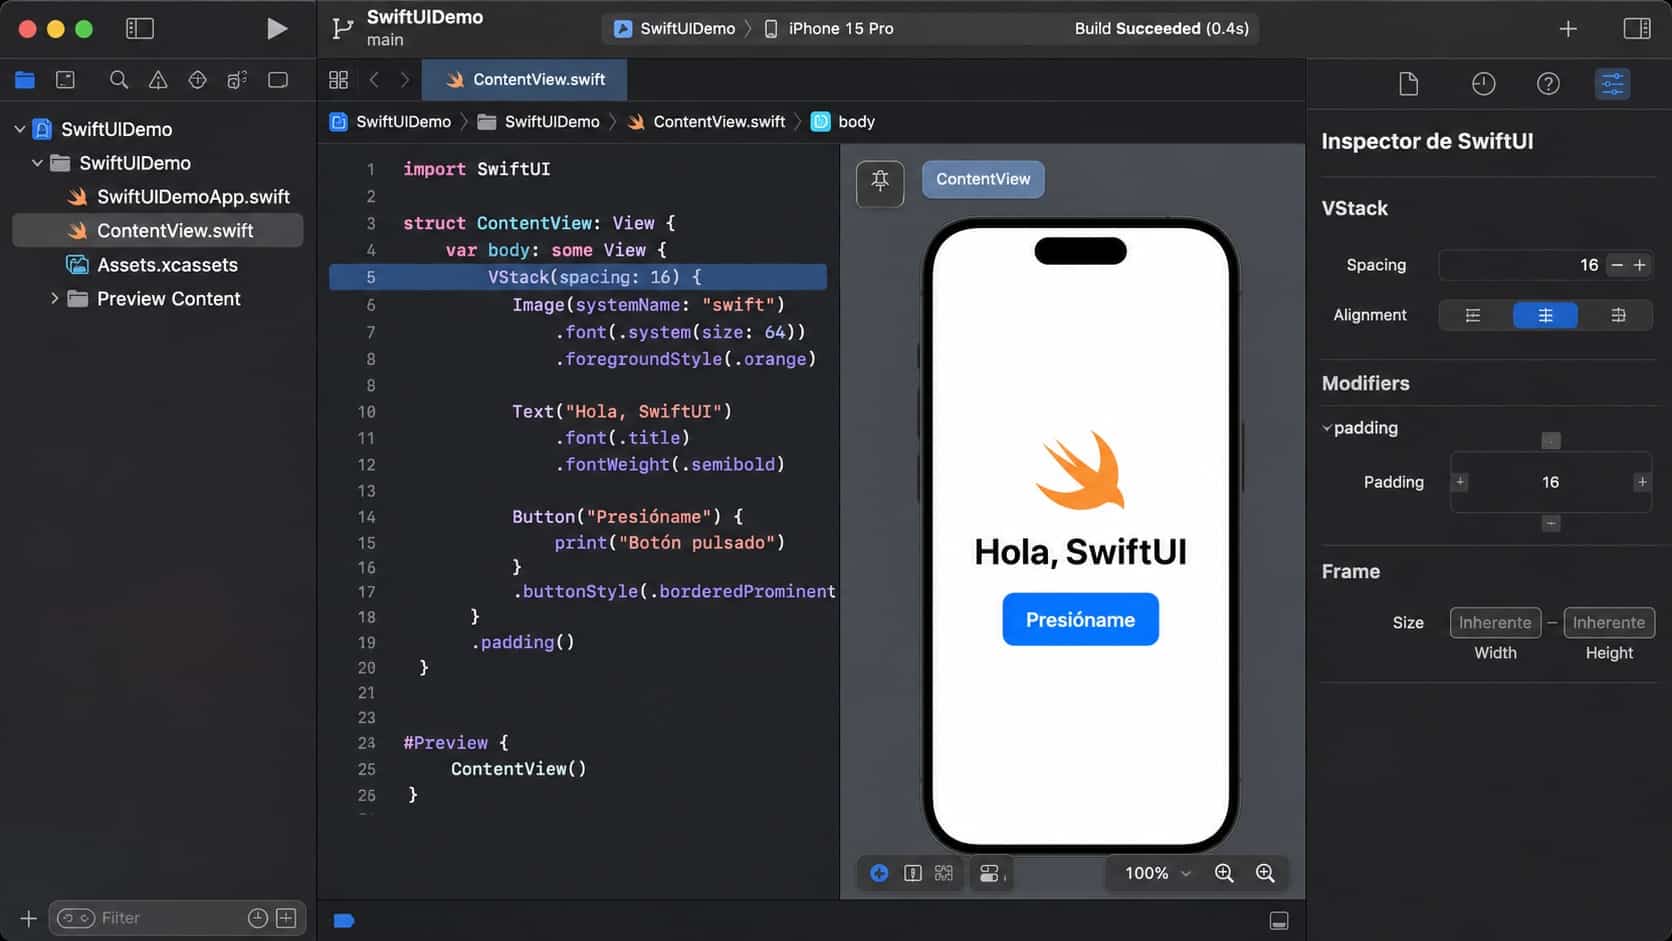

If you are an iOS Developer working with Swift and SwiftUI, knowing how to use the SwiftUI Inspector in Xcodecan significantly improve your development workflow. This powerful feature allows you to inspect and customize interface elements visually without manually changing every modifier in your code.
In this tutorial, you will learn how to open SwiftUI inspector in Xcode, how to access its main features, and how to use it to customize your app’s user interface step by step.
What Is the SwiftUI Inspector in Xcode?
The SwiftUI Inspector is a visual editing tool integrated into Xcode that allows developers to modify the properties of SwiftUI views.
Instead of manually adjusting every property in your Swift code, you can select an interface element and use the inspector to change its attributes, such as font, color, spacing, alignment, and padding.
One of its biggest advantages is that changes made through the inspector are automatically reflected in your source code. This makes it particularly useful for developers who want to combine visual editing with traditional coding.
Step 1: Open Your SwiftUI Project in Xcode
First, launch Xcode on your Mac.
- Open Xcode from your Applications folder.
- Select your existing SwiftUI project from the welcome screen.
- If you want to create a new project, select Create New Project.
- Choose an appropriate application template and select SwiftUI as the interface option.
- Open the ContentView.swift file in the Project Navigator.
This file usually contains the main view of your application.
Make sure your project builds successfully before continuing.
Step 2: Display the SwiftUI Preview Canvas
The next step is to display the Canvas, where Xcode shows a live preview of your application.
To enable it:
- Open the ContentView.swift file.
- Navigate to the Editor menu in the menu bar.
- Select Canvas.
- Wait for Xcode to compile your project and display the preview.
You should now see your SwiftUI interface displayed in the Canvas.
If the preview does not appear, check that your project contains a valid preview declaration, such as:
#Preview {
    ContentView()
}
You can also use Option + Command + P to resume a paused preview.
Step 3: Switch the Canvas to Selectable Mode
Before opening the SwiftUI Inspector, make sure you can select individual interface elements in the preview.
The Canvas supports different interaction modes. Live mode allows you to interact with your application, while Selectable mode lets you select views for editing.
Find the Canvas controls near the bottom of the preview area and switch to Selectable mode if that option is available in your Xcode version.
This allows you to select elements such as Text, Image, Button, VStack, and other SwiftUI components directly from the preview.
Step 4: Open the SwiftUI Inspector
Now comes the most important part of this tutorial.
Follow these instructions:
- Locate the element you want to customize in the Canvas.
- Hold down the Control and Command keys.
- Click the selected interface element.
- A contextual editing menu should appear.
- Select Show SwiftUI Inspector.
Xcode will open the SwiftUI Inspector for the selected view.
You can now explore the available properties and customize the selected component visually.
Tip: You can also Control-click a SwiftUI view declaration in the source editor and select Show SwiftUI Inspector from the contextual menu.
Step 5: Customize Your SwiftUI Components
Once the inspector is open, you can modify different properties depending on the selected view.
For example, if you select a Text component, you may be able to customize:
- Text content.
- Font and font size.
- Font weight.
- Foreground color.
- Alignment.
- Other supported view modifiers.
If you select a VStack, you can explore properties such as spacing and alignment.
The available editing options depend on the selected view and your version of Xcode.
Step 6: Check the Changes in Your Swift Code
One of the most useful features of the SwiftUI Inspector is its integration with the source editor.
When you modify a property through the inspector, Xcode updates the corresponding Swift code automatically.
For example, changing a text font through the inspector may produce a modifier similar to:
Text("Hello, SwiftUI!")
    .font(.title)
    .fontWeight(.semibold)
This makes it easier to understand how visual changes translate into actual SwiftUI code.
Troubleshooting: SwiftUI Inspector Not Showing
If you cannot find the inspector, try these solutions:
- Make sure the Canvas is visible.
- Check that your project builds successfully.
- Select an actual SwiftUI view rather than an empty area.
- Try Control-clicking the view declaration in the source editor.
- Check that you are using a compatible version of Xcode.
Remember that the general Xcode Inspector panel and the contextual SwiftUI Inspector are different tools. The latter provides editing options specifically for supported SwiftUI views.
Conclusion
Learning how to open SwiftUI inspector in Xcode is an essential skill for anyone developing Apple applications.
By following these steps, you can inspect views, customize interface properties, and understand how visual changes affect your Swift code.
Whether you are a beginner or an experienced iOS Developer, using the SwiftUI Inspector can make your development process faster, more intuitive, and more productive.