Introduction
If you have been developing iOS applications with SwiftUI for some time, you have surely encountered one of the most classic walls in mobile development: managing the virtual keyboard.
Picture the scene: you have designed a perfect registration screen. The text fields are aligned, the colors are harmonious, and the visual hierarchy is impeccable. You run the application in the simulator, tap on the first text field, and… bam! The keyboard appears, covering the bottom half of your screen.
So far, everything is normal. The problem arises when the user, after typing, tries to see what is further down. Instinctively, they swipe their finger across the screen to scroll and see the “Sign Up” button that has remained hidden. But the keyboard remains there, immovable, covering the interface and frustrating the user.
This user experience is deficient. In the Apple ecosystem, users expect fluidity. They expect the interface to react naturally to their gestures. If they scroll down, it means they want to view content, not keep typing. Therefore, the keyboard should move out of the way.
In the days of UIKit, this required a complex dance of NotificationCenter notifications, keyboard frame calculations, UIScrollView contentInsets adjustments, and tap gesture managers. It was tedious and error-prone.
Fortunately, SwiftUI has matured immensely. While early versions required similar tricks or UIKit wrappers, modern versions (specifically starting from iOS 16 and Xcode 14) offer native and extremely simple tools to handle this behavior with a single line of code.
In this comprehensive tutorial, we will explore how to implement the “hide or dismiss keyboard on scroll” functionality in SwiftUI. We will not only see the quick solution but also delve into the different options Apple offers us, understand why it works, and how to apply it in real-world scenarios like complex lists and forms.
Prerequisites
To follow this tutorial and take advantage of the modern APIs we are going to use, you need the following:
- Xcode 14 or higher: The tools we will use were introduced with the iOS 16 SDK.
- iOS 16.0 deployment target or higher in your project: If your application needs to support older versions (like iOS 14 or 15), we will briefly mention alternatives at the end, but the main focus will be the modern and recommended way.
- Basic knowledge of SwiftUI: You should feel comfortable creating Views, using basic
StateandBinding, and understanding the structure of containers likeVStackandScrollView.
The Problem: A Common Scenario
Before jumping to the solution, let’s recreate the problem to understand exactly what we are fixing.
We are going to create a simple view that simulates a long form. We will need a ScrollView because the content will exceed the screen height, and several TextFields.
Open Xcode and create a new SwiftUI project. Replace the content of ContentView.swift with the following code:
import SwiftUI

struct ContentView: View {
    @State private var text1 = ""
    @State private var text2 = ""
    @State private var text3 = ""
    @State private var text4 = ""
    // "Here is a lot of filler content to ensure the screen needs to scroll. Keep going down to find more text fields."
    @State private var longText = "Aquí hay mucho contenido de relleno para asegurar que la pantalla necesite hacer scroll. Sigue bajando para encontrar más campos de texto."

    var body: some View {
        NavigationView {
            ScrollView {
                VStack(spacing: 25) {
                    Text("Formulario Largo") // "Long Form"
                        .font(.largeTitle)
                        .fontWeight(.bold)
                        .padding(.top)

                    Text(longText)
                        .padding()

                    TextField("Campo superior 1", text: $text1) // "Top Field 1"
                        .textFieldStyle(.roundedBorder)
                        .padding(.horizontal)

                    TextField("Campo superior 2", text: $text2) // "Top Field 2"
                        .textFieldStyle(.roundedBorder)
                        .padding(.horizontal)

                    // Filler space to force scrolling
                    Color.gray.opacity(0.2)
                        .frame(height: 300)
                        .overlay(Text("Contenido intermedio...")) // "Intermediate content..."

                    TextField("Campo inferior 3 (Problemático)", text: $text3) // "Bottom Field 3 (Problematic)"
                        .textFieldStyle(.roundedBorder)
                        .padding(.horizontal)

                    TextField("Campo inferior 4 (Muy problemático)", text: $text4) // "Bottom Field 4 (Very problematic)"
                        .textFieldStyle(.roundedBorder)
                        .padding(.horizontal)

                    Button(action: {
                        print("Formulario enviado") // "Form submitted"
                    }) {
                        Text("Enviar Formulario") // "Submit Form"
                            .frame(maxWidth: .infinity)
                            .padding()
                            .background(Color.blue)
                            .foregroundColor(.white)
                            .cornerRadius(10)
                    }
                    .padding()
                }
            }
            .navigationTitle("Demo Teclado") // "Keyboard Demo"
        }
    }
}

struct ContentView_Previews: PreviewProvider {
    static var previews: some View {
        ContentView()
    }
}
Analysis of the Problem
Run this code in a simulator (preferably one with a small screen like an iPhone SE or standard iPhone 14/15, not a Pro Max, to accentuate the problem).
- Tap on “Campo inferior 4” (Bottom Field 4).
- The keyboard comes up and, thanks to SwiftUI’s automatic management, the view will try to scroll so that the text field is visible just above the keyboard.
- Now, try scrolling up to see the title “Formulario Largo” or the first text field.
- Observation: The content scrolls behind the keyboard, but the keyboard remains stubbornly open. You have to explicitly look for a “Done” or “Return” button on the keyboard (if you configured it) to close it.
This is what we want to fix. The user’s scroll gesture is a clear intention of “I want to navigate, I don’t want to type anymore”.
The Modern Solution: .scrollDismissesKeyboard(_:)
Apple answered our prayers at WWDC 22 with the introduction of iOS 16. They introduced a new view modifier designed specifically to control this behavior in scrollable containers (ScrollView, List, Form).
The modifier is:
.scrollDismissesKeyboard(_ mode: ScrollDismissesKeyboardMode)This modifier is applied directly to the container that scrolls.
The Scroll Modes
The mode parameter is a ScrollDismissesKeyboardMode enum that gives us granular control over how and when the keyboard should disappear. Let’s look at the available options:
.automatic(Default) This is the system’s default behavior. SwiftUI tries to guess what is best based on the context.- In a
List, the default behavior is usually to hide the keyboard interactively upon dragging. - In a generic
ScrollView, sometimes the default behavior does nothing (as we saw in our previous example). That is why we often need to be explicit.
- In a
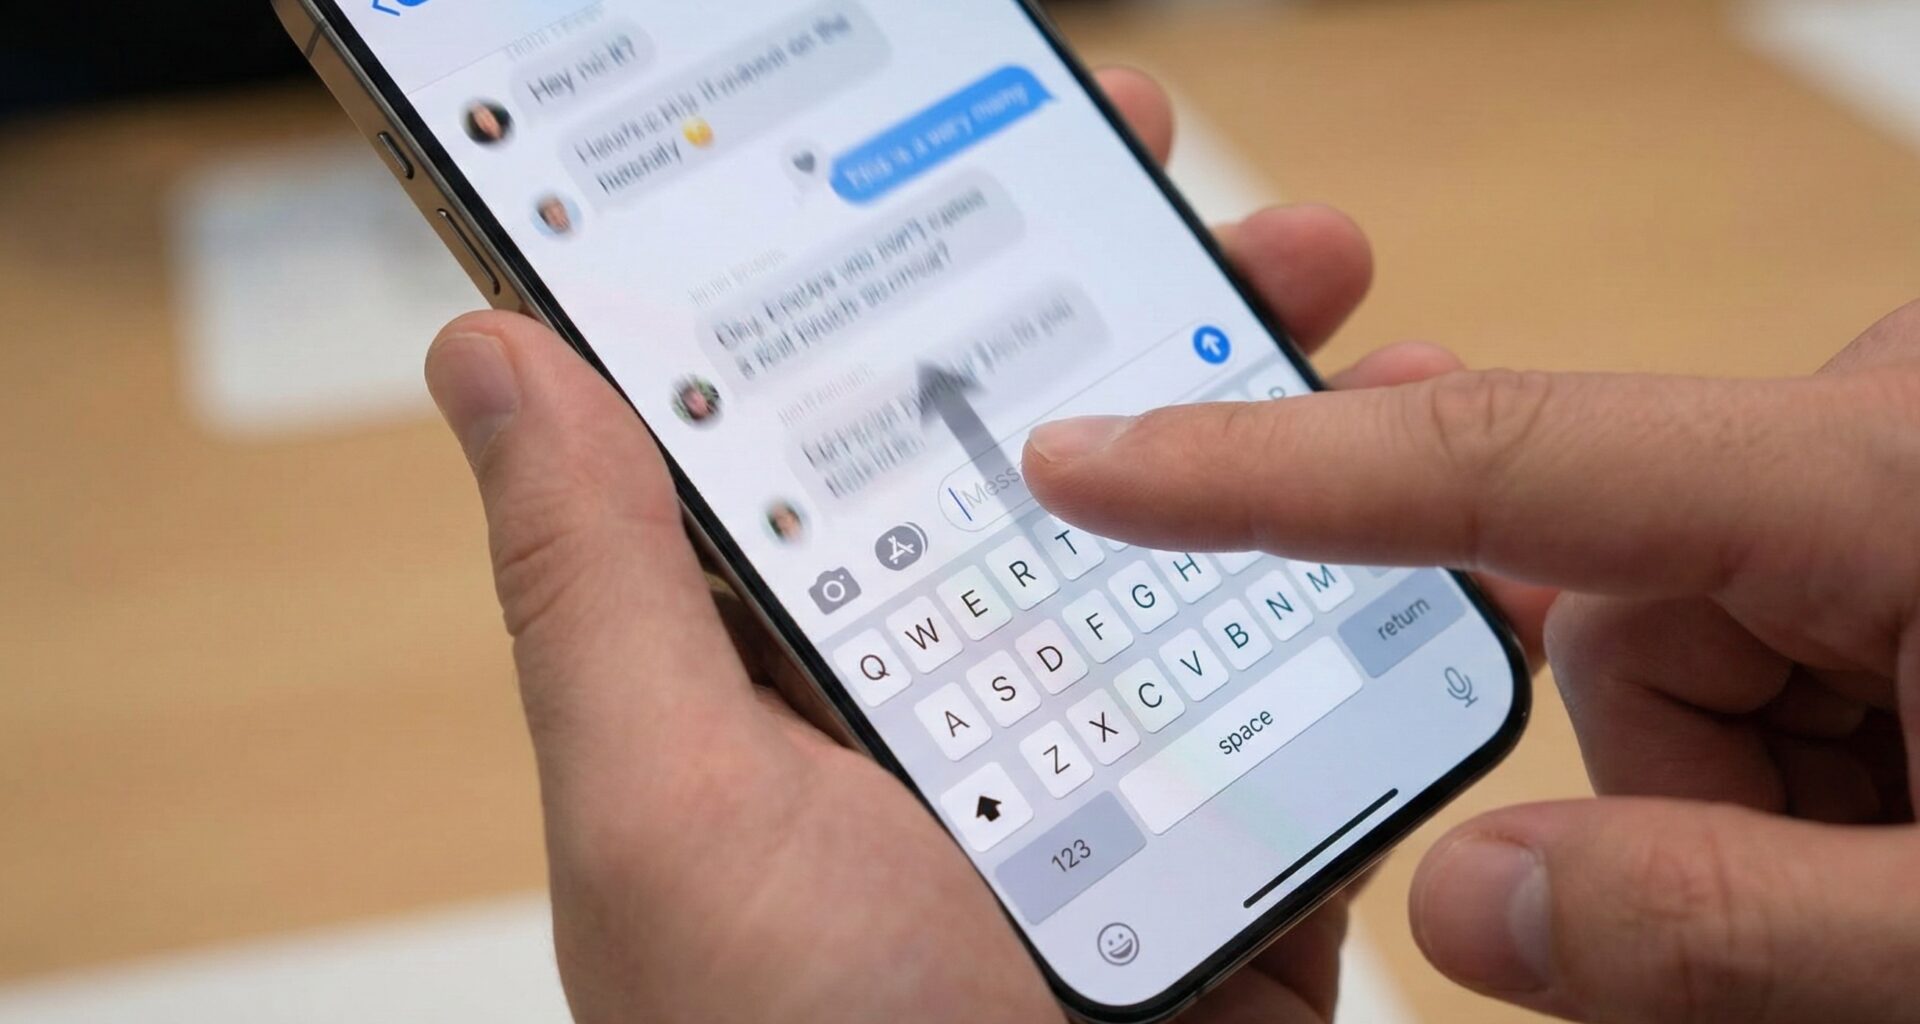
.interactively(The recommended option for UX) This is the jewel in the crown of iOS user experience. When you use this mode, the keyboard is dismissed following the user’s finger as they make the scroll gesture. If the user starts scrolling and then changes their mind and returns to the original position without lifting their finger, the keyboard goes back up. It is the behavior you see in the Messages app (iMessage) when you are typing a message and decide to scroll up to read the history. It feels natural, physical, and very polished..immediatelyAs its name suggests, the keyboard disappears instantly the moment any scroll movement is detected. There is no finger-tracking animation. It is an abrupt closing. It is useful if you want a very quick response, but generally, it feels less “native” than the interactive mode..neverForces the keyboard to remain visible even if the user scrolls. There are few use cases for this, perhaps in a terminal or console app where you always need the keyboard active, but for standard forms, this is usually bad UX.
Applying the Solution to Our Example
Let’s fix our ContentView.swift using the mode that offers the best experience: .interactively.
It is crucial to remember where to apply this modifier. It is not applied to the TextFields, nor to the VStack. It is applied to the container that generates the scrolling, in this case, the ScrollView.
Modify the code of your ContentView.swift as follows:
import SwiftUI

struct ContentView: View {
    // ... (all your @State variables remain the same) ...
    @State private var text1 = ""
    @State private var text2 = ""
    @State private var text3 = ""
    @State private var text4 = ""
    @State private var longText = "Aquí hay mucho contenido de relleno para asegurar que la pantalla necesite hacer scroll. Sigue bajando para encontrar más campos de texto."


    var body: some View {
        NavigationView {
            ScrollView { // <-- Identify the scroll container
                VStack(spacing: 25) {
                   // ... (All the content of your VStack remains exactly the same) ...
                   Text("Formulario Largo")
                        .font(.largeTitle)
                   // ... etc, etc ...
                   TextField("Campo inferior 4 (Muy problemático)", text: $text4)
                        .textFieldStyle(.roundedBorder)
                        .padding(.horizontal)

                    Button(action: {
                        print("Formulario enviado")
                    }) {
                        Text("Enviar Formulario")
                           // ... button styles
                            .frame(maxWidth: .infinity)
                            .padding()
                            .background(Color.blue)
                            .foregroundColor(.white)
                            .cornerRadius(10)
                    }
                    .padding()
                }
            }
            .navigationTitle("Demo Teclado")
            // APPLY THE SOLUTION HERE:
            .scrollDismissesKeyboard(.interactively)
        }
    }
}
Note: Ensure that your simulator or device is running iOS 16 or higher for this to work.
Testing the Solution
Run the application again.
- Tap “Campo inferior 4” again. The keyboard appears.
- Now, scroll slowly up or down.
- Observe the magic: The keyboard begins to lower following exactly the speed and position of your finger. If you release it halfway, it finishes lowering. If you reverse the gesture before releasing, it goes back up.
Problem solved with a single line of code!
Deep Dive: Lists and Forms
The previous example used a generic ScrollView. What about structured SwiftUI views like List and Form?
These views come with smarter keyboard behaviors “out of the box”. Often, a List already has the .interactively behavior enabled by default in modern iOS.
However, it is always good practice to be explicit in your code to ensure consistent behavior, regardless of future changes in system defaults.
If you change your ScrollView to a Form in the previous example, the modifier works exactly the same:
NavigationView {
    Form {
        // ... your text fields ...
    }
    .navigationTitle("Formulario Demo")
    .scrollDismissesKeyboard(.interactively) // Works perfectly on Forms
}
This is excellent because it unifies the way we handle the keyboard across all types of scrollable containers.
Going Further: Hiding the Keyboard on “Tap Outside”
Although this tutorial focuses on hiding the keyboard on scroll, complete keyboard management often also requires the keyboard to hide when the user taps anywhere on the screen that is not a text field (a “tap outside”).
The .scrollDismissesKeyboard modifier does not handle taps, only scrolling.
If the user taps an empty area of the ScrollView without dragging, the keyboard will remain there. For a 5-star user experience, we should combine both techniques.
In modern SwiftUI, the most robust way to handle “tap outside” is using an overlay with a TapGesture that forces the end of editing in the entire view hierarchy.
We can add a small extension to View to facilitate this:
extension View {
    func endTextEditing() {
        UIApplication.shared.sendAction(#selector(UIResponder.resignFirstResponder), to: nil, from: nil, for: nil)
    }
}
(Note: Although UIApplication.shared seems “old school” UIKit, it remains the most reliable way to globally dismiss the keyboard in SwiftUI to date).
Now, let’s combine this in our ContentView:
struct ContentView: View {
    // ... states ...

    var body: some View {
        NavigationView {
            ScrollView {
                VStack(spacing: 25) {
                    // ... form content ...
                }
            }
            .navigationTitle("Demo Teclado Pro")
            // Solution 1: Hide on Scroll
            .scrollDismissesKeyboard(.interactively)
            // Solution 2: Hide on tap outside
            .onTapGesture {
                self.endTextEditing()
            }
        }
    }
}
By adding .onTapGesture to the main container (or the ScrollView), any tap that is not intercepted by a button or text field will trigger the endTextEditing() function, dismissing the keyboard.
By combining .scrollDismissesKeyboard(.interactively) and the .onTapGesture, you have covered 99% of the frustrations users have with keyboards on iOS.
What About Older iOS Versions (pre-iOS 16)?
If your project targets a minimum of iOS 14 or iOS 15, the .scrollDismissesKeyboard modifier will not be available, and the compiler will give you an error.
In these cases, the solution is more “manual”. It involves detecting the drag gesture on the ScrollView and dismissing the keyboard programmatically.
Here is an example of how it was done (and continues to be done for legacy support):
// Solution for iOS 14 / 15
ScrollView {
    VStack {
        // Content
    }
}
.gesture(
    DragGesture().onChanged { _ in
        // If any drag is detected, dismiss the keyboard
        UIApplication.shared.sendAction(#selector(UIResponder.resignFirstResponder), to: nil, from: nil, for: nil)
    }
)
Disadvantages of this old method:
- It is not “interactive”. The keyboard does not follow the finger; it simply closes abruptly as soon as the drag begins (similar to the
.immediatelymode). - The
DragGesturecan sometimes conflict with other gestures inside the ScrollView if you have complex interactive elements (like a map or a horizontal carousel inside vertical scrolling).
For these reasons, it is strongly recommended to use the modern API .scrollDismissesKeyboard whenever your project compatibility allows. The result is much more professional and requires less maintenance code.
Conclusion
Keyboard management has gone from being a constant headache in iOS development to a trivial task thanks to improvements in SwiftUI.
The .scrollDismissesKeyboard(.interactively) modifier is an essential tool that should be in any SwiftUI developer’s toolkit. It provides that “Apple quality” feel with minimal effort, ensuring your users never feel trapped by the virtual keyboard while navigating your forms or lists.
Always remember to think about the user’s intent: if they are scrolling, it’s because they want to view content, not type. Make their life easier by moving the keyboard out of their way.
If you have any questions about this article, please contact me and I will be happy to help you 🙂. You can contact me on my X profile or on my Instagram profile.